Aug
18
[this is the first article of a two-part series. The second article can be seen here]
A recent Martin refret provides a great backdrop to discussing what makes desirable in fretwork for the guitar player. This articles focuses on fret issues along with what a player desires in good fretwork. In a second article, I share my process for producing excellent frets and a well-playing guitar .
What Musicians Desire in Great Fretwork
Often guitar players may not realize their frets are responsible for less than desirable playing. After all, guitar players are used to the way their guitars play. As the frets slowly worsen, the playing experience degrades little by little, the guitarist becomes the proverbial frog in the boiling pot. Inevitable fret wear, humidity, and original construction approaches are all possible contributors.
Worn or uneven frets present three possible outcomes:
- Intonation issues: fret wear causes the string to fret forward of the fret crown peak, shortening the string length and causing sharp notes.
- Fret buzz: a fretting a string on a significantly worn fret can lower the string such that the next fret (with less wear and more height) makes contact with the string when struck. High frets resulting from inconsistent fret installation or loose frets are also buzz producers.
- Difficulty playing: fretting strings over inconsistent fretwork causes muted notes and left-hand fatigue. Often excessive neck relief (too much bow) and high saddle height compensate for inconsistent fretwork (more space under the strings reduces the likelihood of buzzing.)
As musicians, what would we like from our frets? Primarily three attributes:
Accurate frets – Properly installed, fully seated, and crowned at the exact same height. Accurate frets are the foundation for a well set up guitar.
Comfortable left-hand play – When frets are accurately installed, the string height at the nut can be minimized, making fretting on the first several frets far easier. Neck relief (neck bow) can be reduced, improving mid-neck string feel and reducing fretting effort. Finally saddle height can be reduced, improving upper register fretting.
Durability and stability – Selection of fret material directly relates to wear. While most guitars come with nickel frets, two longer lasting materials are available.
- Evo wire, with a gold-colored hue, tends to last 50% longer than nickel. It’s formulation adds 20% zinc in place of copper for greater wear resistance.
- Stainless steel frets can also be installed, which often last the life of the guitar with no need for replacement.
Both of these alternate materials are more expensive to install, but return value on far less frequent fret work in the future. Finally for stability, frets should be glued in place during installation. This helps ensure a lack of fret movement, thereby not introducing high frets (and fret buzz) over time.
The next article, The Road to Great Frets, shares the fret installation and setup process which achieves the above attributes.
Dec
17
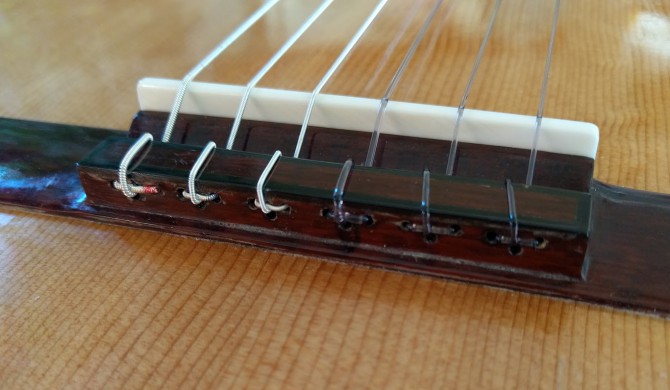
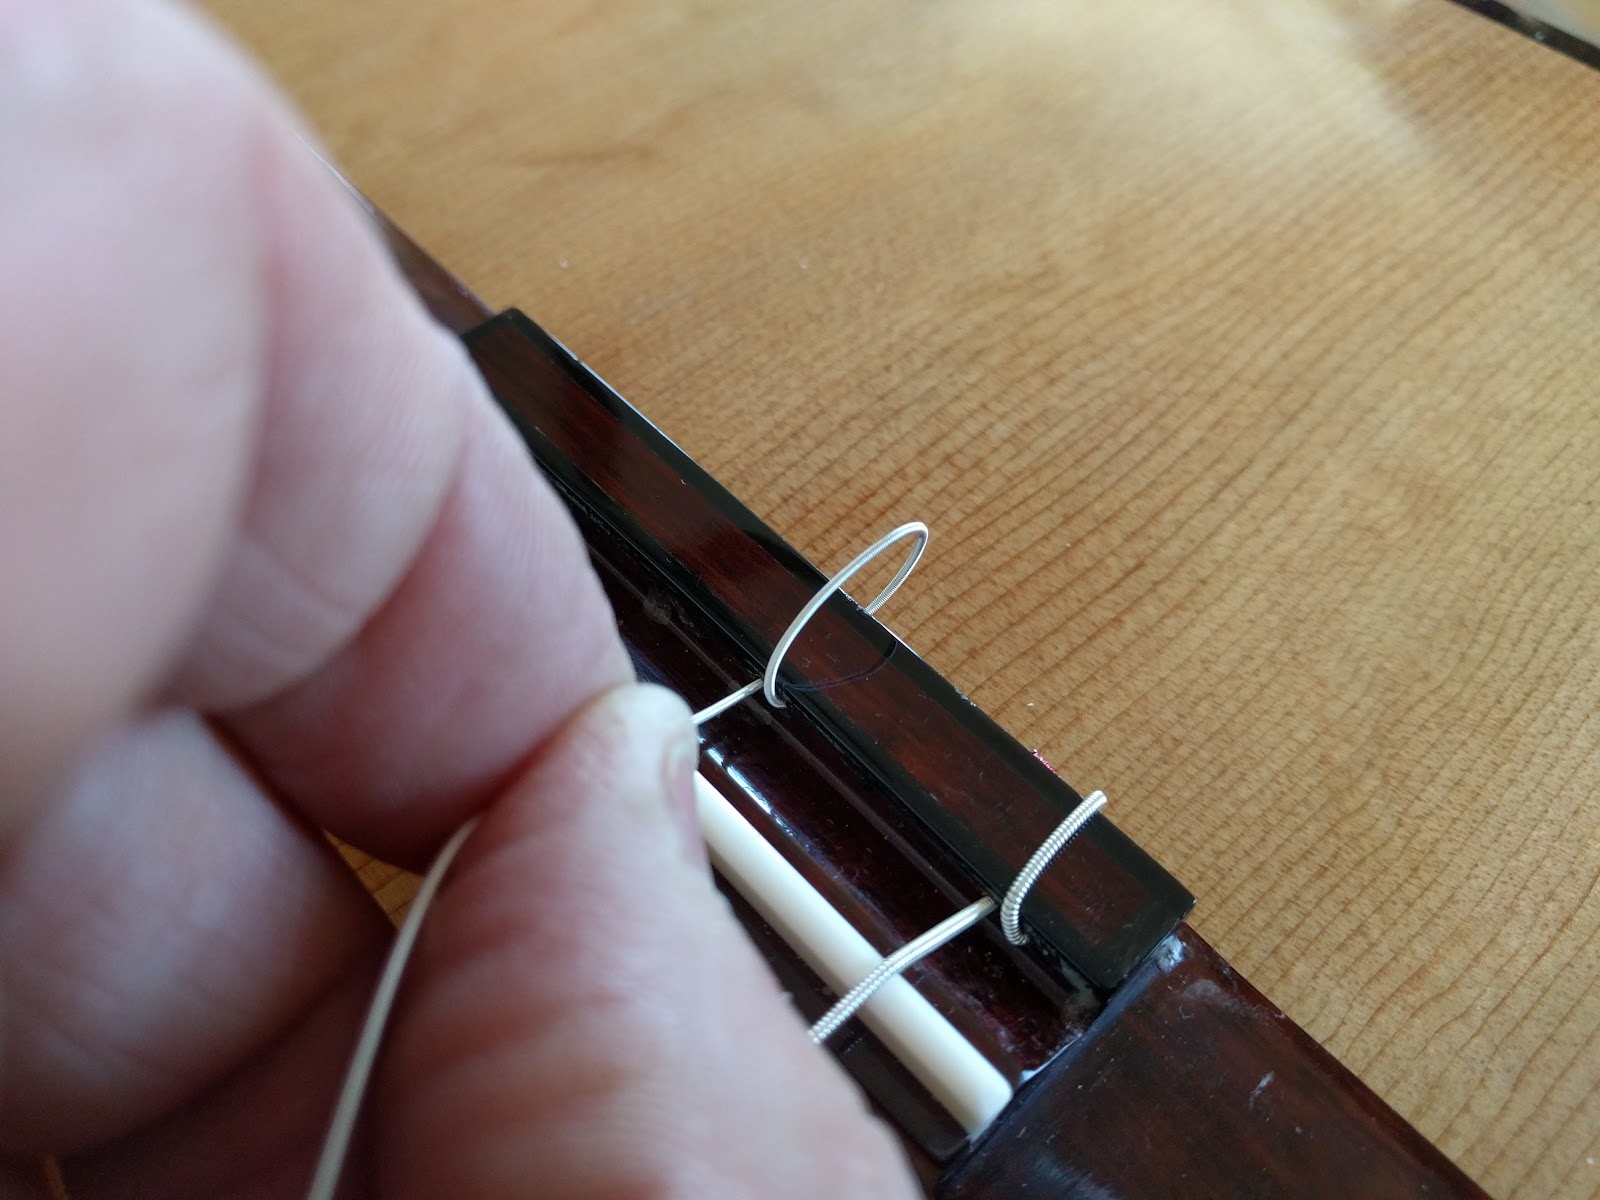
In the last article I discussed the benefits of an 18-hole bridge. The next question might be, how does one go about stringing one up? Here is an easy step-by-step guide. Let’s start by looking at the hole configuration. There are 3 holes for each string. The left upper hole as well as bottom hole go all the way through the tie block. The top right hole goes half way into the tie block and is used to capture the string end.
In the guide below we are going to string the 4th (D) string.
Step 1 – Start the string-up.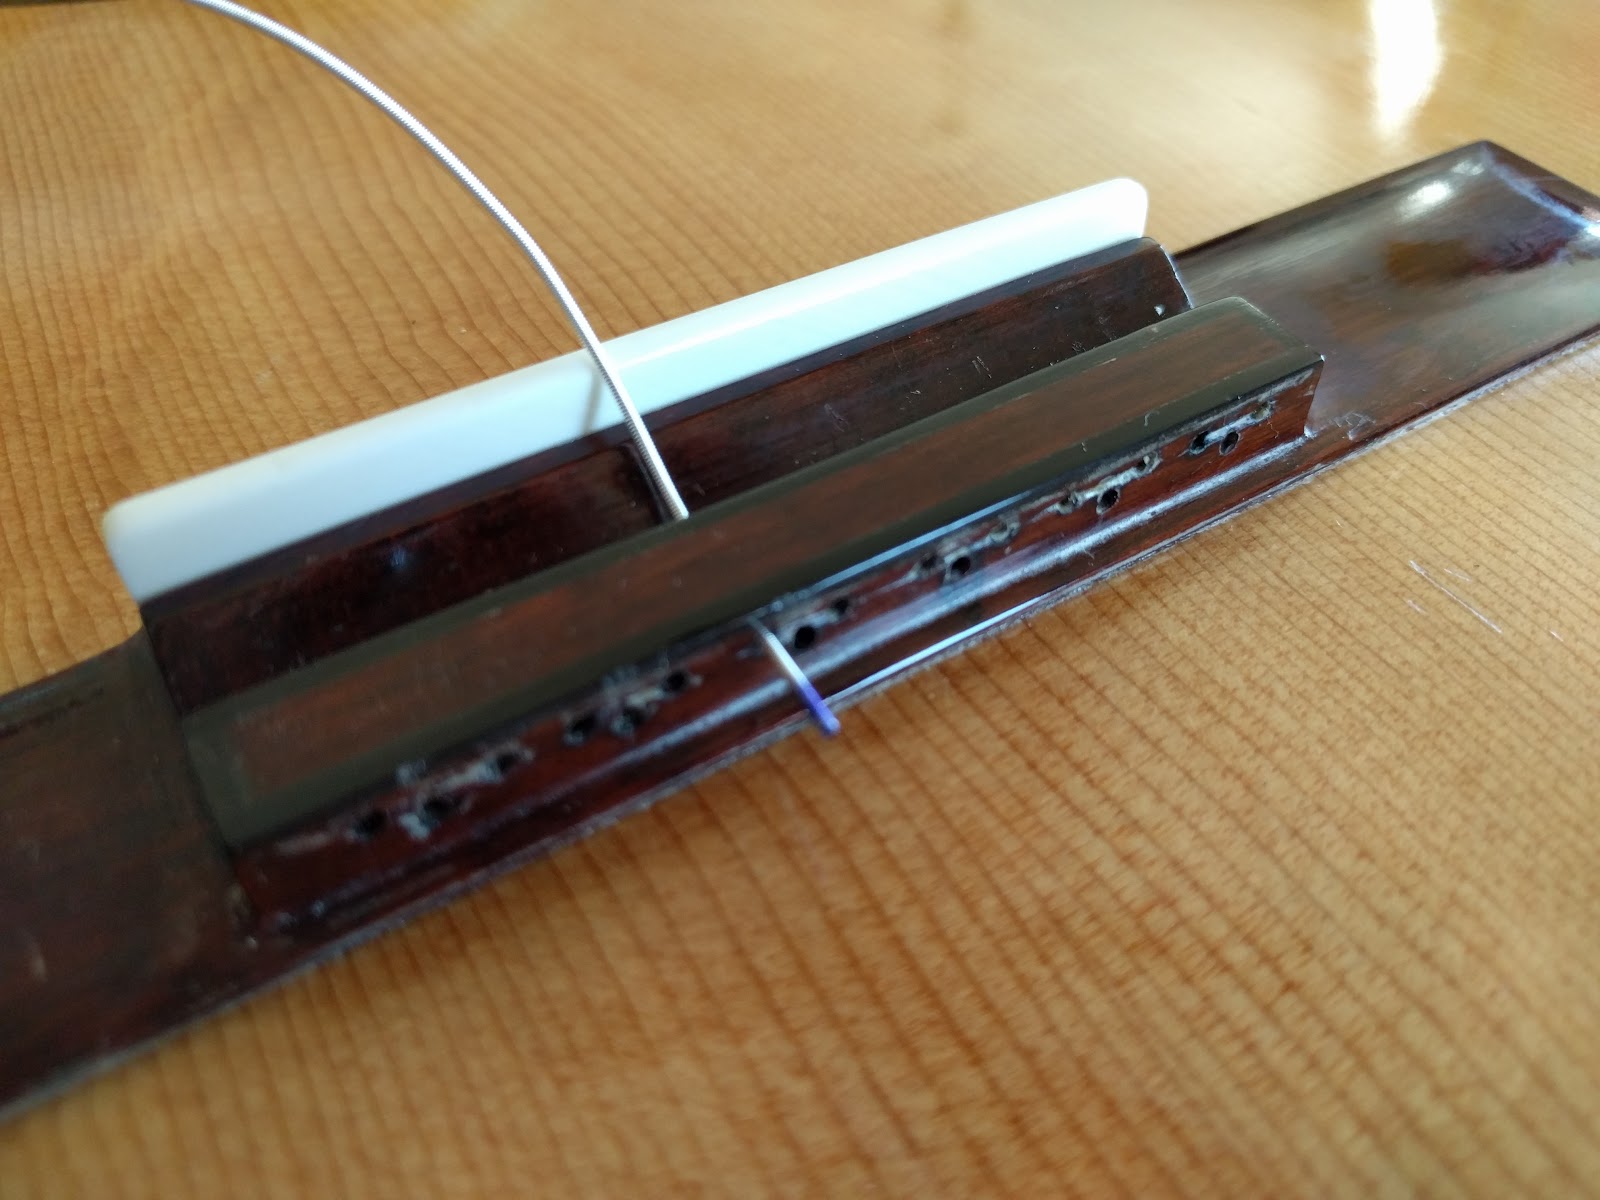
From the front of the tie block, insert the string in the bass-side hole.
Step 2 – Bury the string end.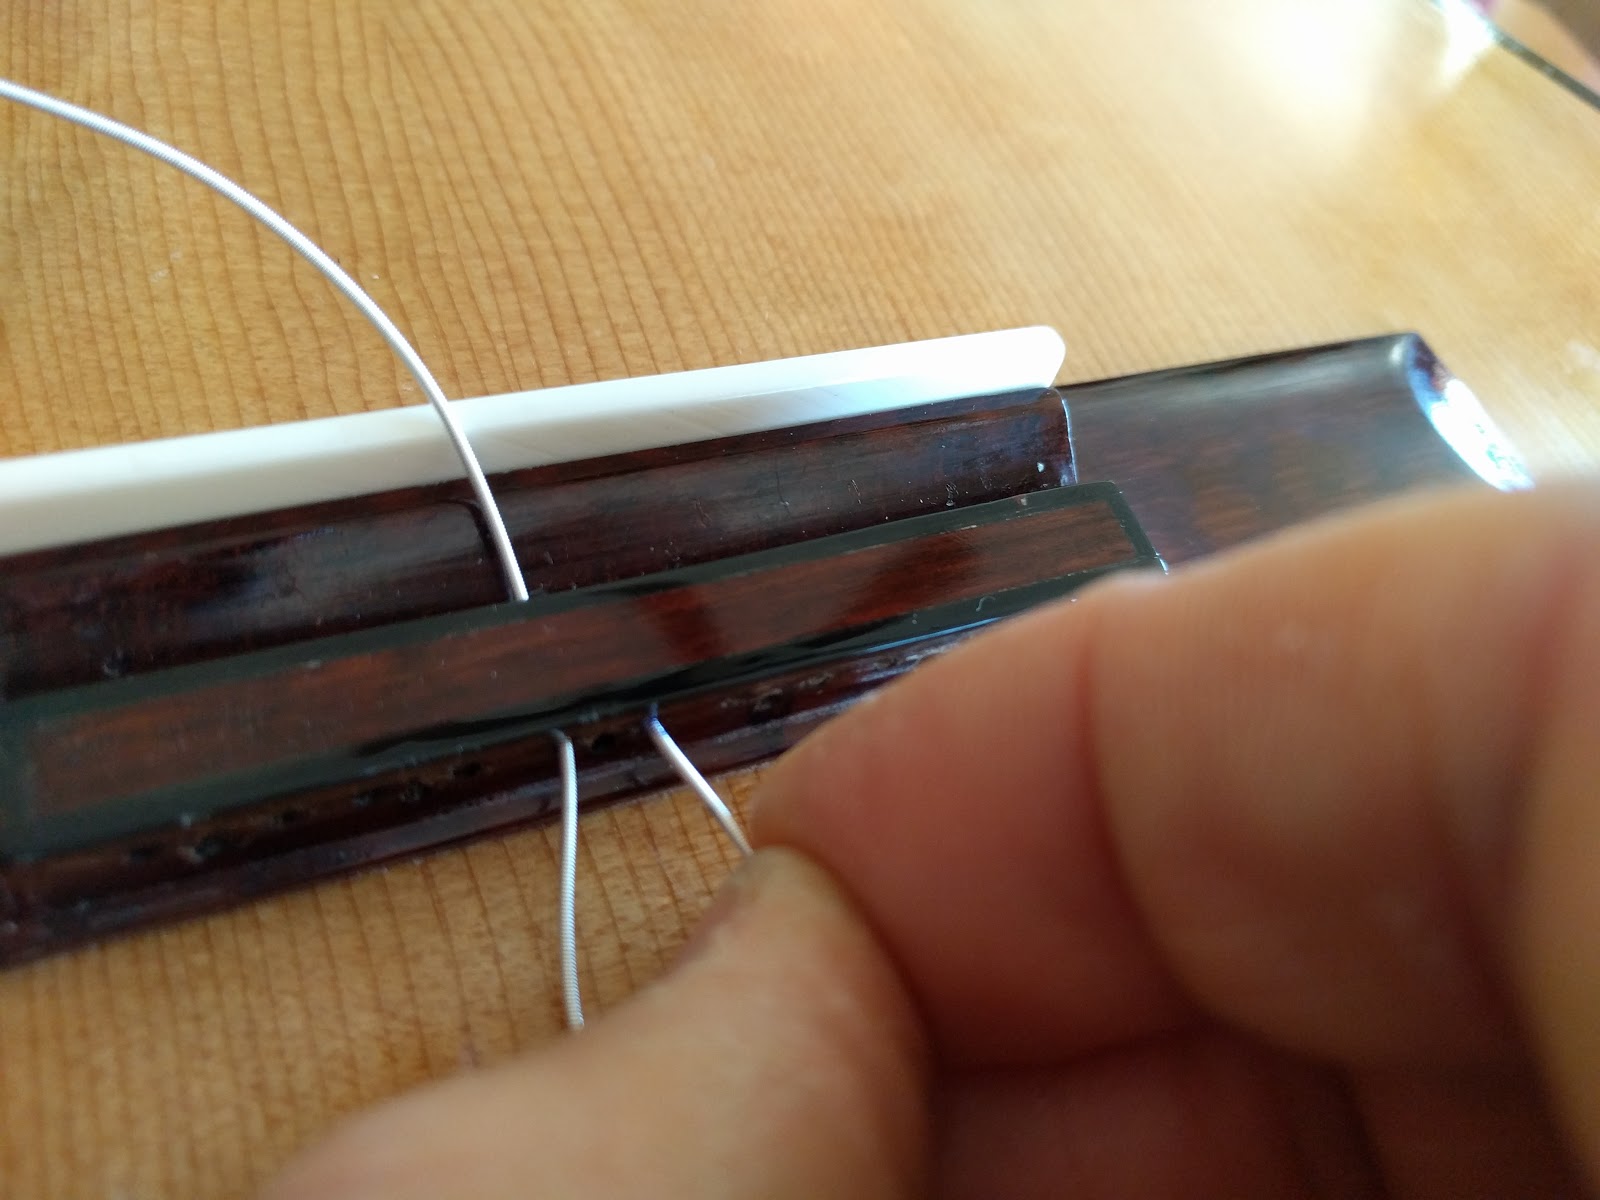
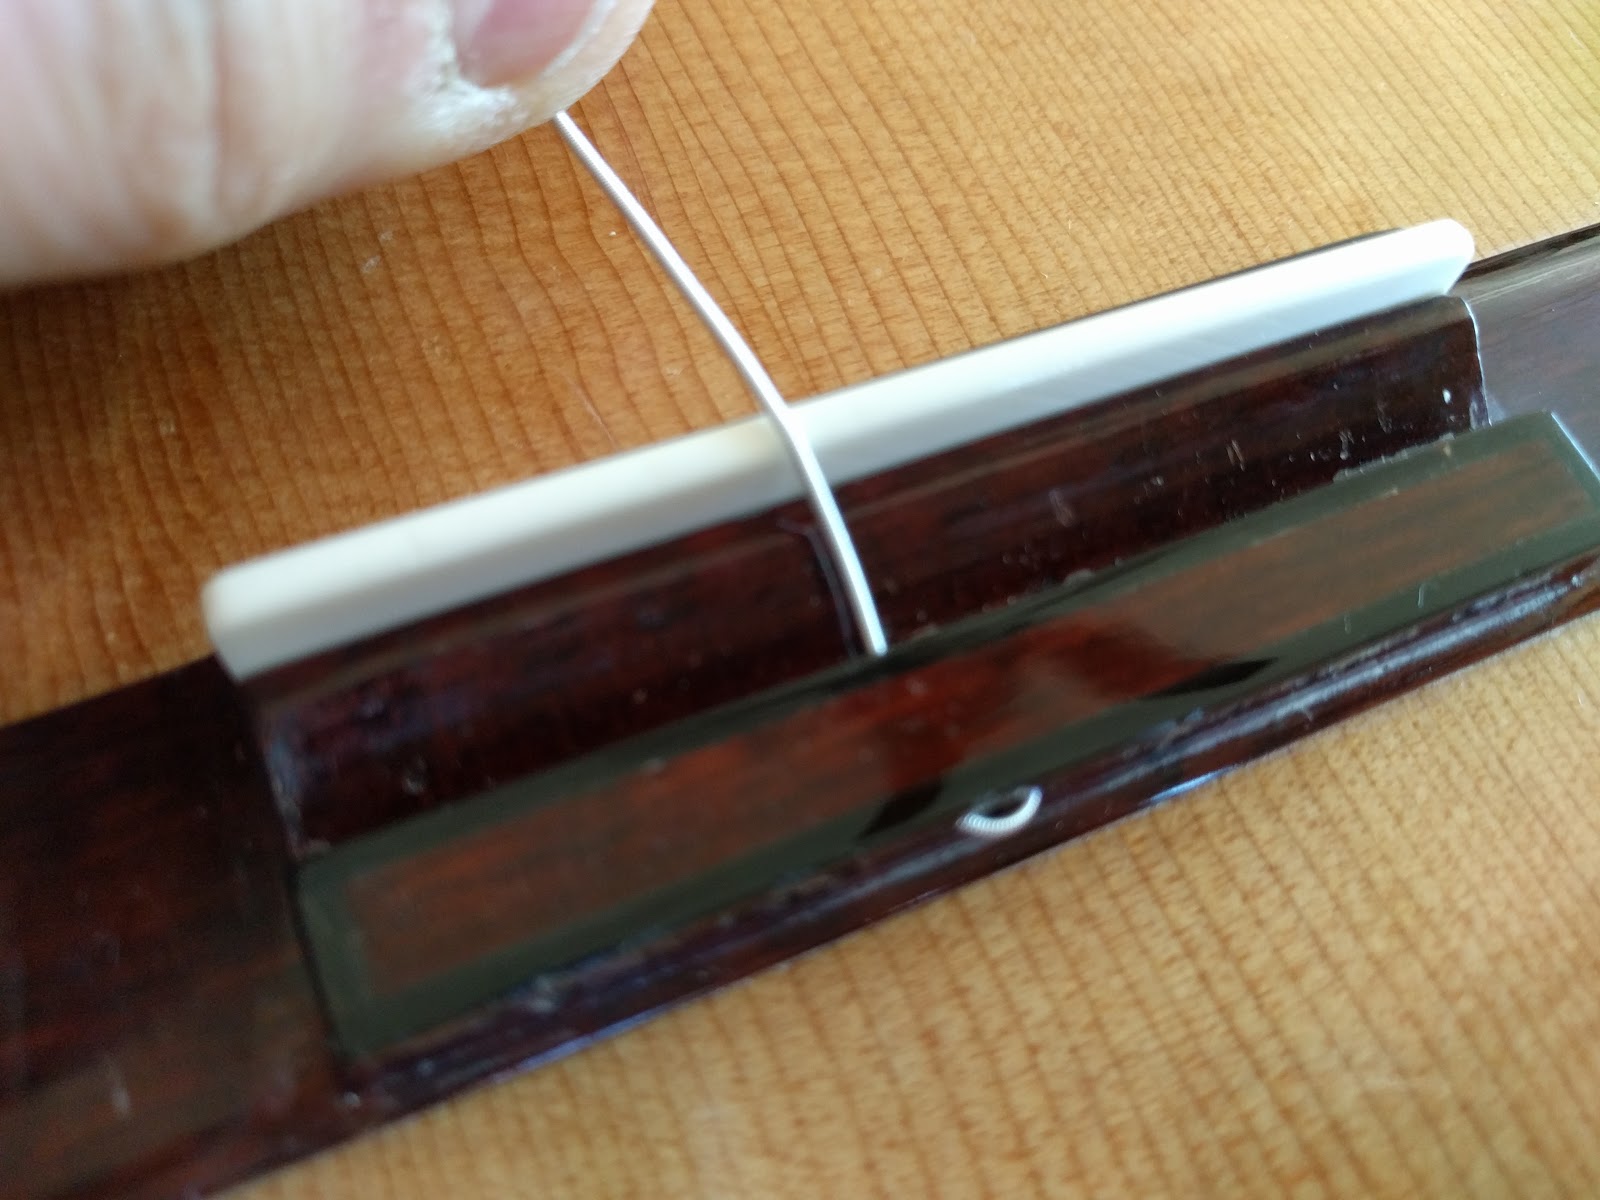
The treble side hole is the “half-hole”. Insert the end of the string into the half-hole until it stops.
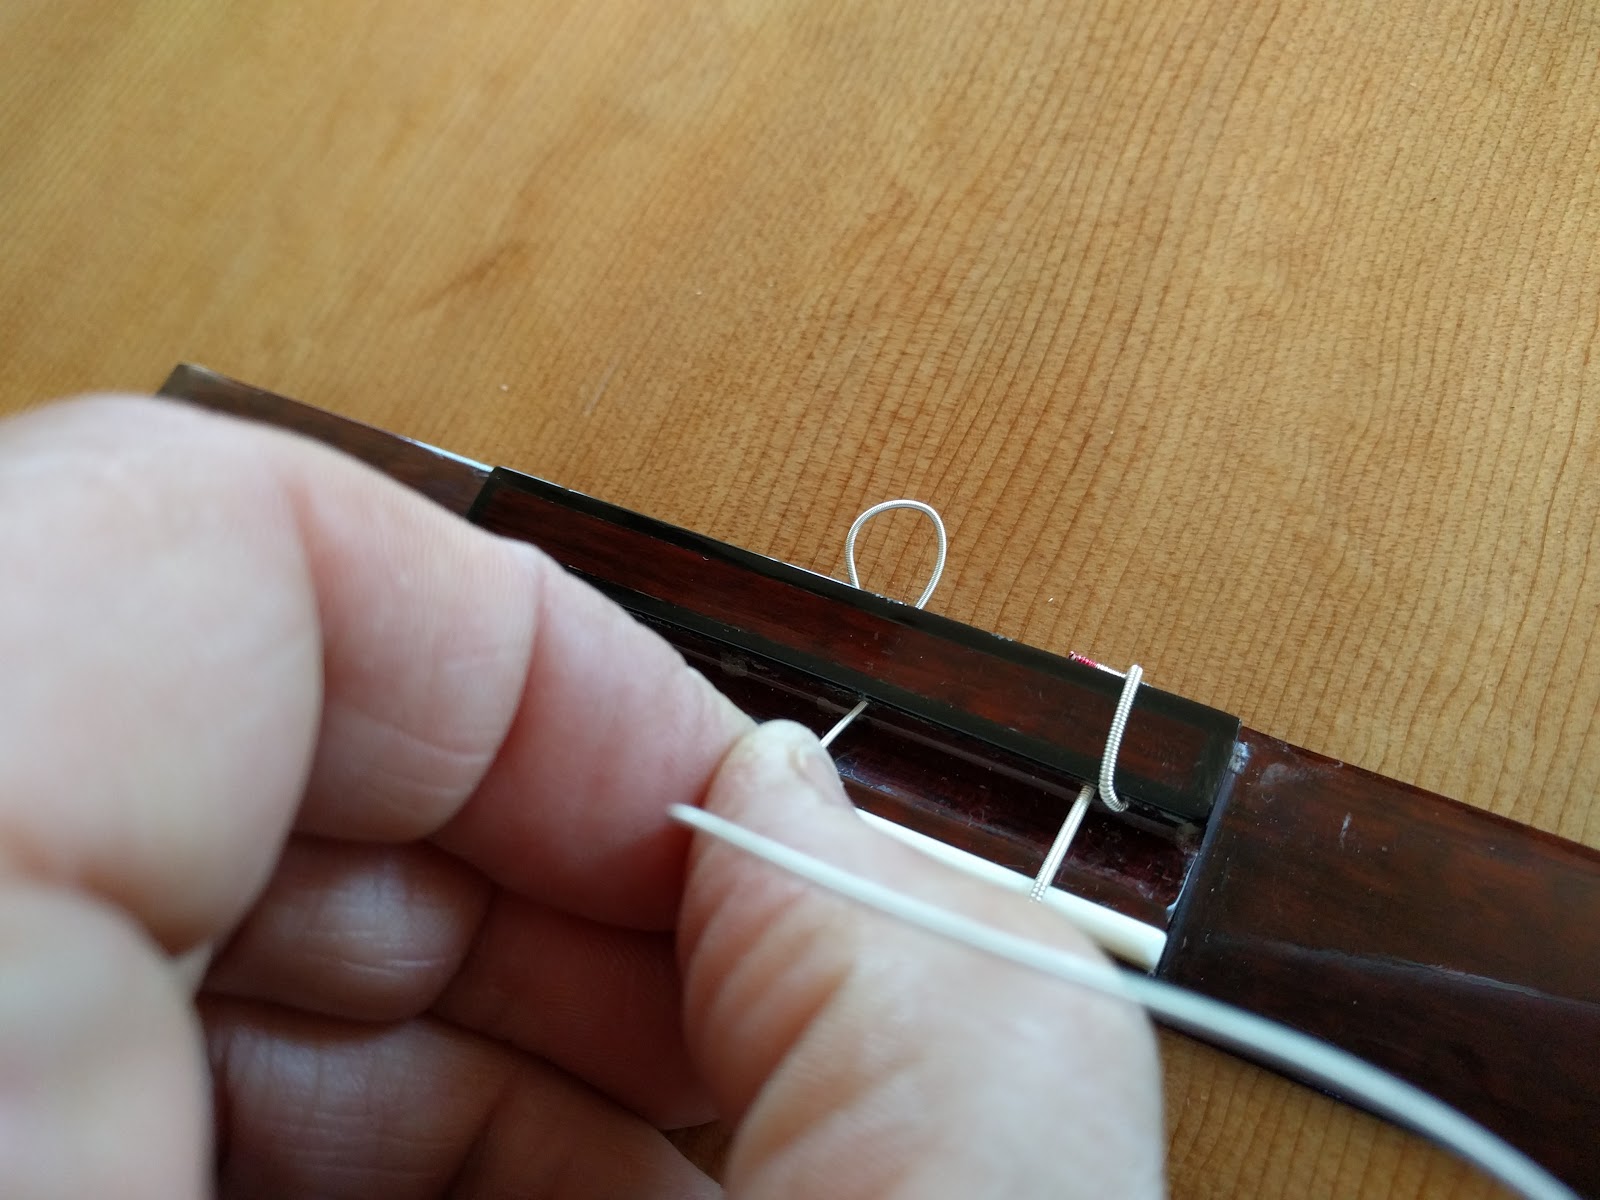
Step 3a. Lock the string.
Pull on the string, taking up the slack.
 Step 3b.
Pull until the string is taut along the back of the bridge.
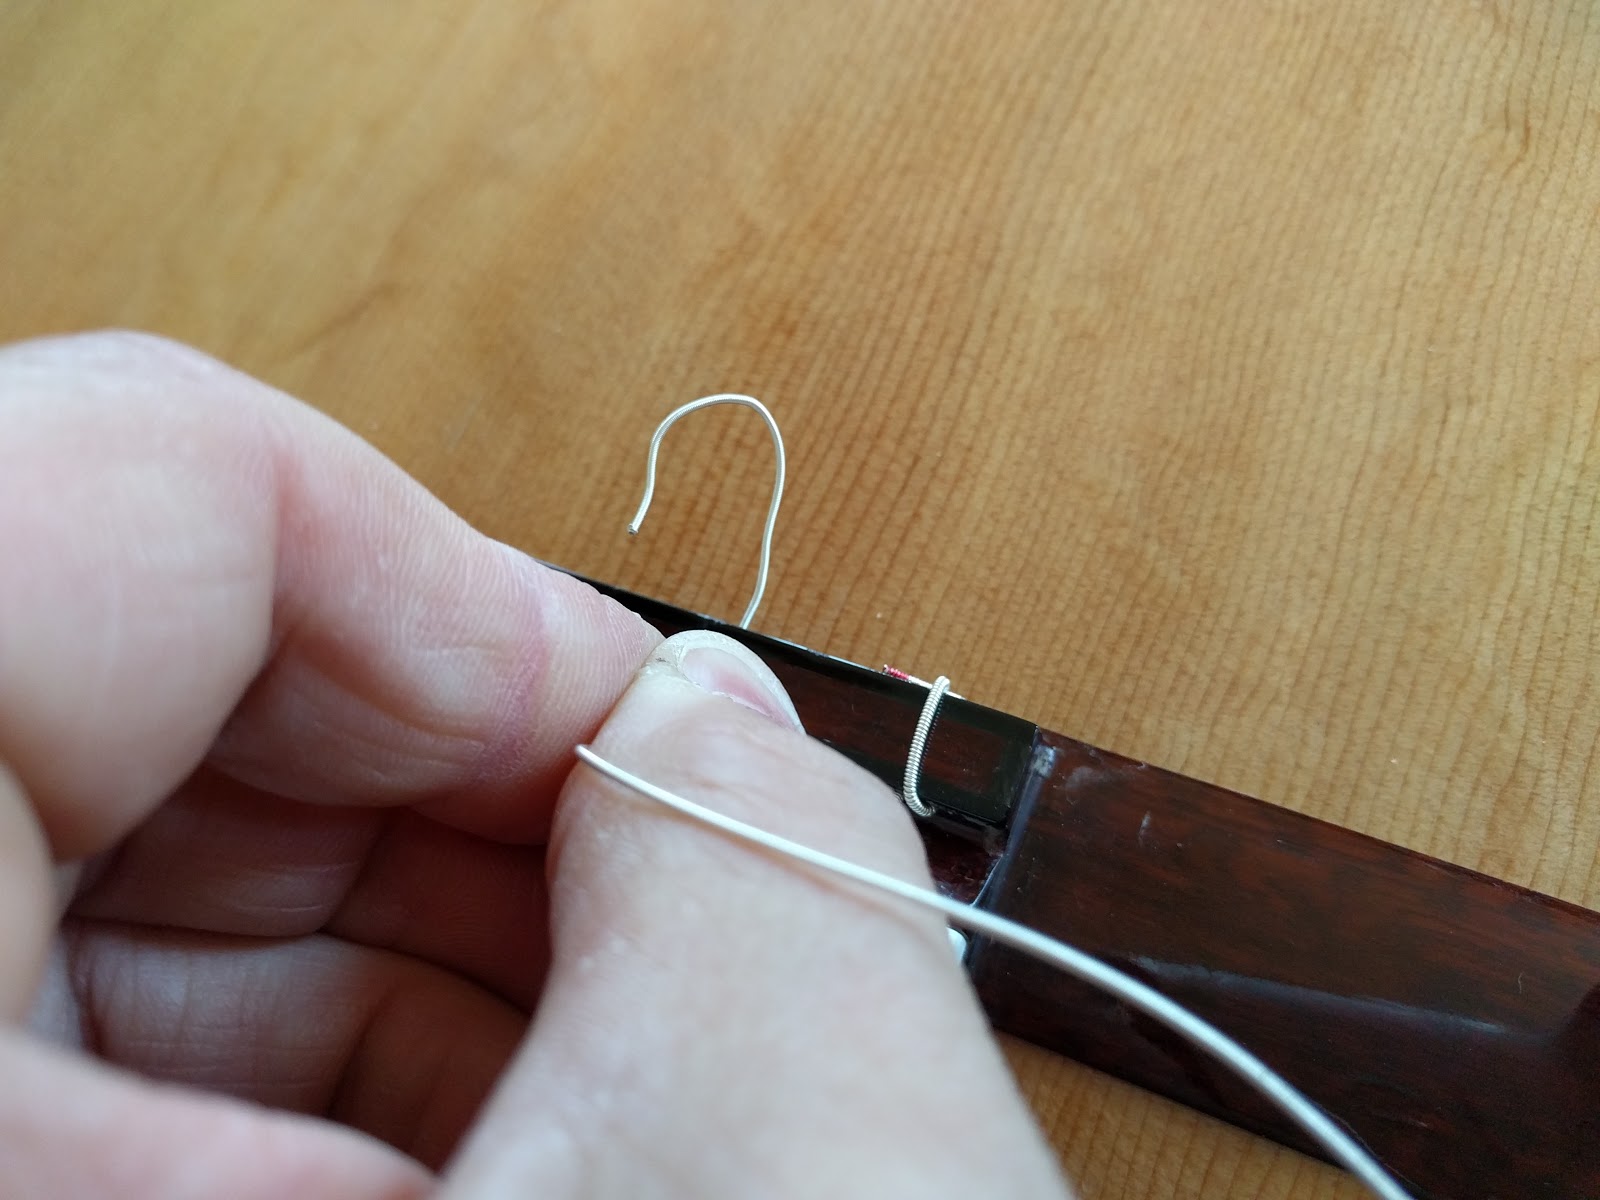
Step 4a – Wrap the string.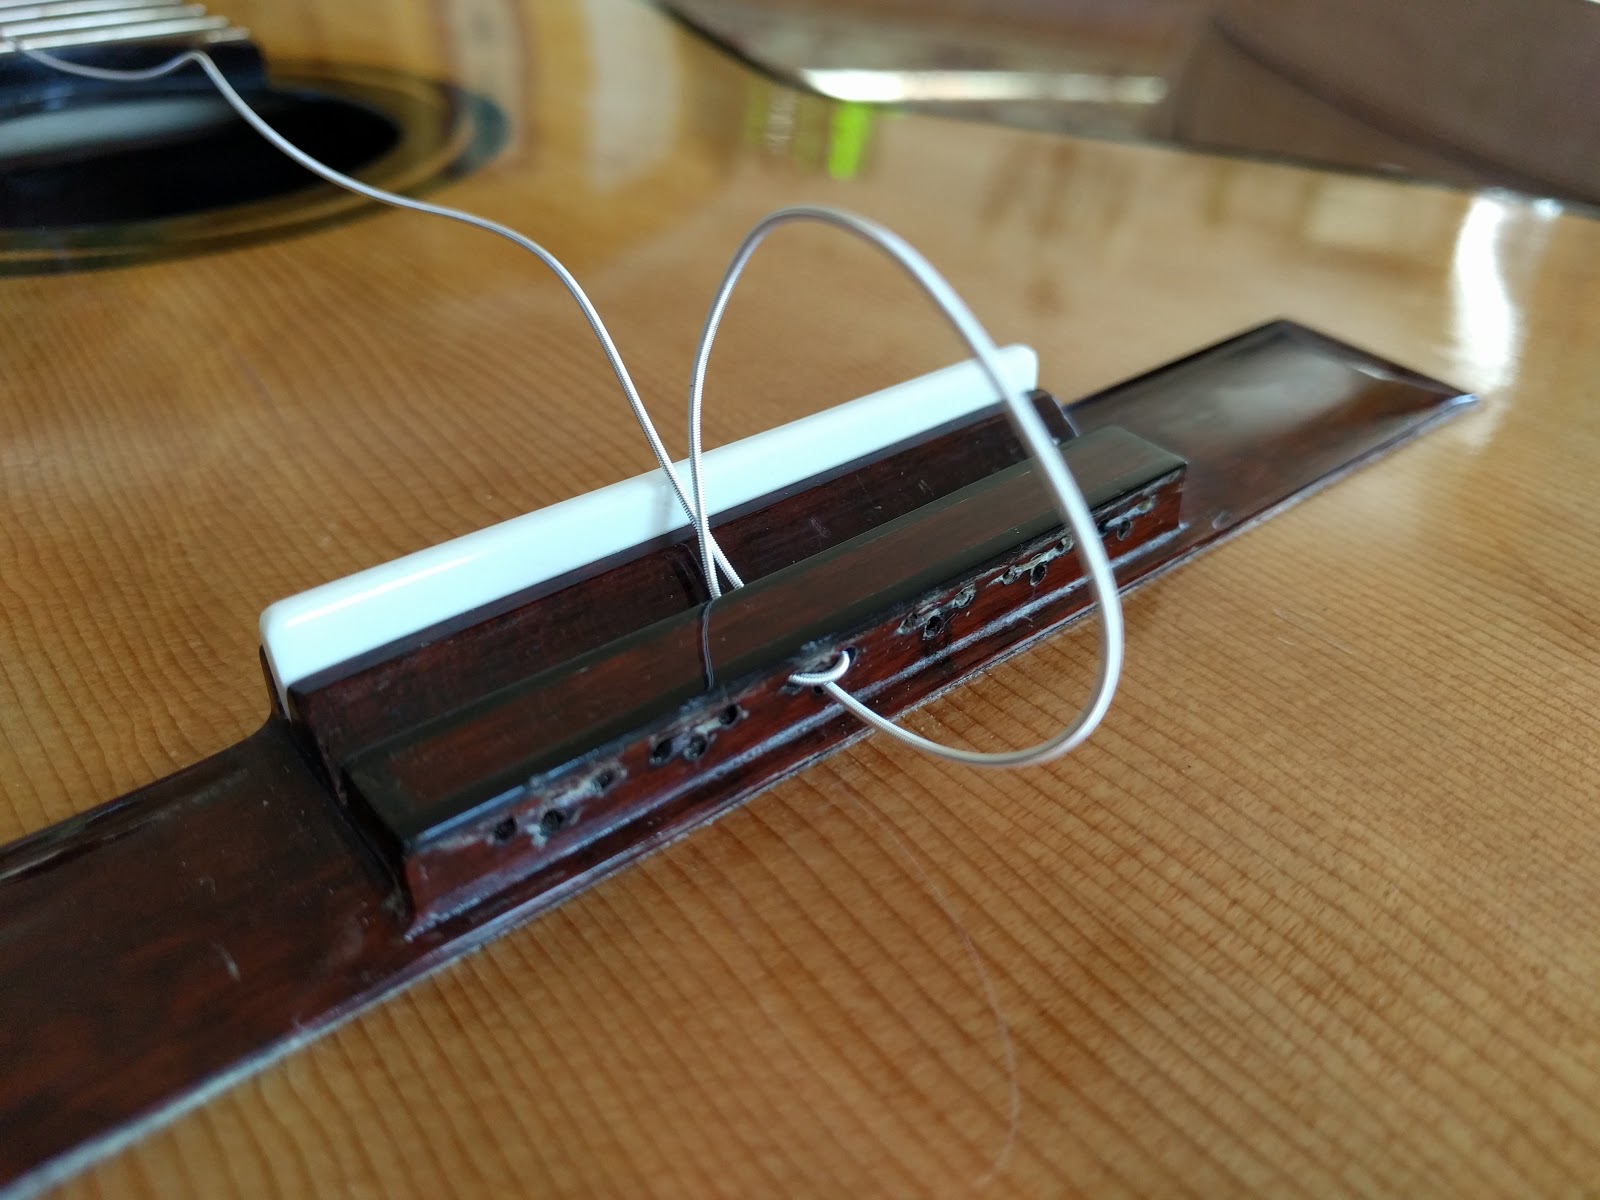
Take the other end of the string and insert it from the back into the lower hole.
Step 4b.
Pull the string through so it creates a loop over the tie block.
Step 4c.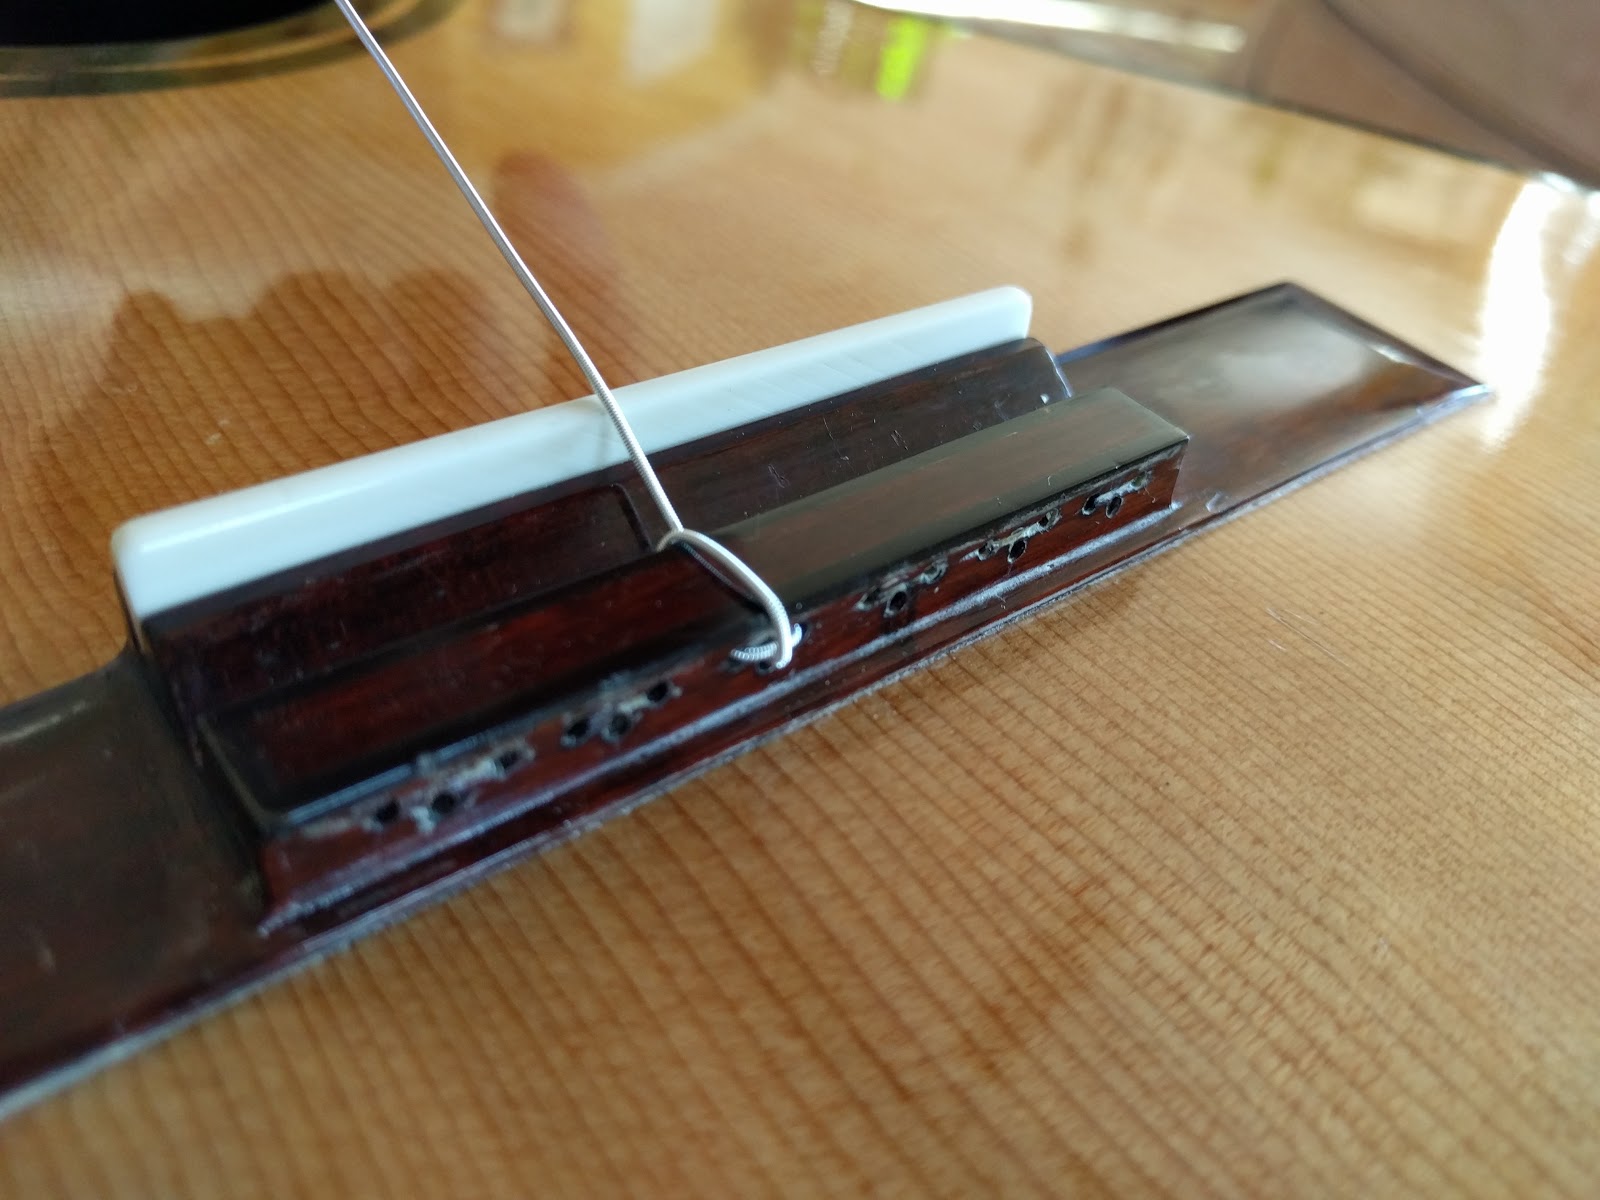
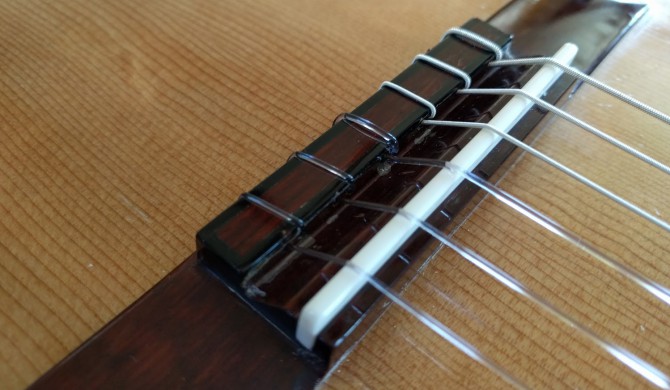
Finish pulling the string until it is taut over the tie block. Notice two things – first how the wrap locks the string into place at the back by vertically crossing the string. Secondly note how low the string exits the front of the tie block, providing more than adequate break angle over the saddle. From here, you simply string the other end up at the tuning machine.
Complete. 
When all six strings are wrapped, the bridge has a clean look, with a single string over the tie block and no string ends exposed in the back.
Very simple, foolproof, and keeps your top safe from string slap. But with that said, how does one remove the string? Simply grab the string from the saddle side and push toward the back until it is all the way through (first photo). The string unloops from the tie block. Once again press the string from the saddle toward the back, and the string end will push back (photos 2 & 3). Simply pull the string through and it is removed.
Dec
17
In the world of classical guitars we all learned to string bridges with six holes. Simple – one hole per string, or so it seemed. The various antics to hold each string in place, especially those slippery trebles, is often an exercise in classical guitar gymnastics, especially while trying to turn the corresponding tuner with the left hand, the guitar precariously balanced on the lap while the right index fingernail holds the loop of a treble spring on the bridge.
String slap damage behind the treble E string
Aside the antics, there are two issues stringing a traditional 6-hole classical guitar – the first is trying to keep the treble strings steady while tensioning, that is, unless one performs a wrap knot, which I don’t particularly care for. The second is having a treble string that comes loose at the tie block, whips around, its tip slapping the soundboard behind the bridge and gashing the top.
Got a lighter? Good, since one technique involves swelling the bridge-side string end of those pesky trebles with a flame. For the 6-hole, swelling the treble string tips with a lighter is my preferred approach. But seriously, though, there has to be a better way. And there is – the 18-hole tie block.
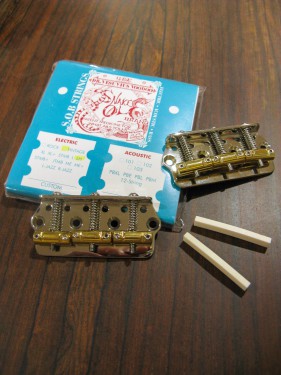
A Better Tie Block – The 18-Hole Bridge
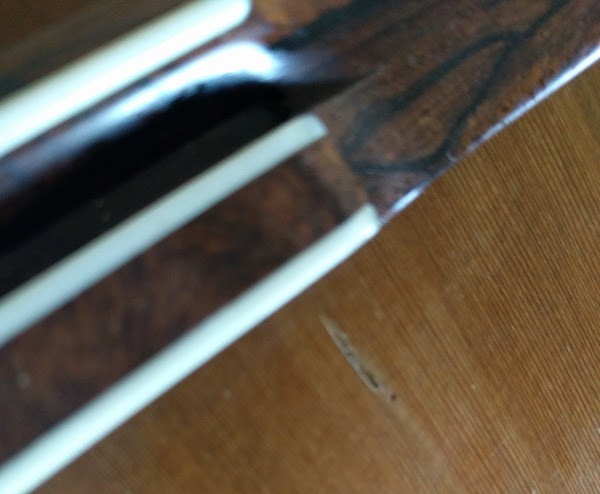
For each string, three holes are drilled into the tie block. Two of those holes go all the way through the tie block, while the third rightmost hole is drilled from the rear and stops halfway into the tie block. This “half hole” is where the string end is ultimately placed. Let’s take a look at some of the benefits:
- String ends are cleanly concealed in the tie block, in the 3rd half hole.
- Since the string end is trapped in the tie block, it cannot come loose. This prevents top damage that can occur from the dreaded string slap, as shown in the photo above.
-
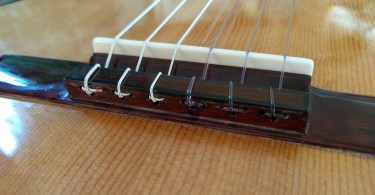
The 18-hole bridge completely strung. Note how string ends are buried in the tie block.
Stringing the guitar is actually far more simple than a 6-hole bridge. Once the tie block is strung one can simply lead the string to the tuner and tension, without the gymnastics of holding the string in place at the bridge.
- If you wish to string the guitar as a 12-hole tie block, that can be done.
- With a 12-hole or 18-hole tie block, the break angle increases over a 6-hole – that is, the downward angle of the string from the saddle to the hole is significantly increased. This can be good for sound, and also helpful if neck angle changes over time have caused the saddle to be filed down. This prolongs the need for “slipping the heel” on a spanish neck guitar or doing a neck reset on a more modern neck construction.

In the next article, we’ll walk through a step-by-step stringing of an 18-hole bridge. Hopefully the above information gives some food for thought for converting a 6-hole to an 18-hole, or ordering your new classical with an 18-hole bridge.
Mar
05
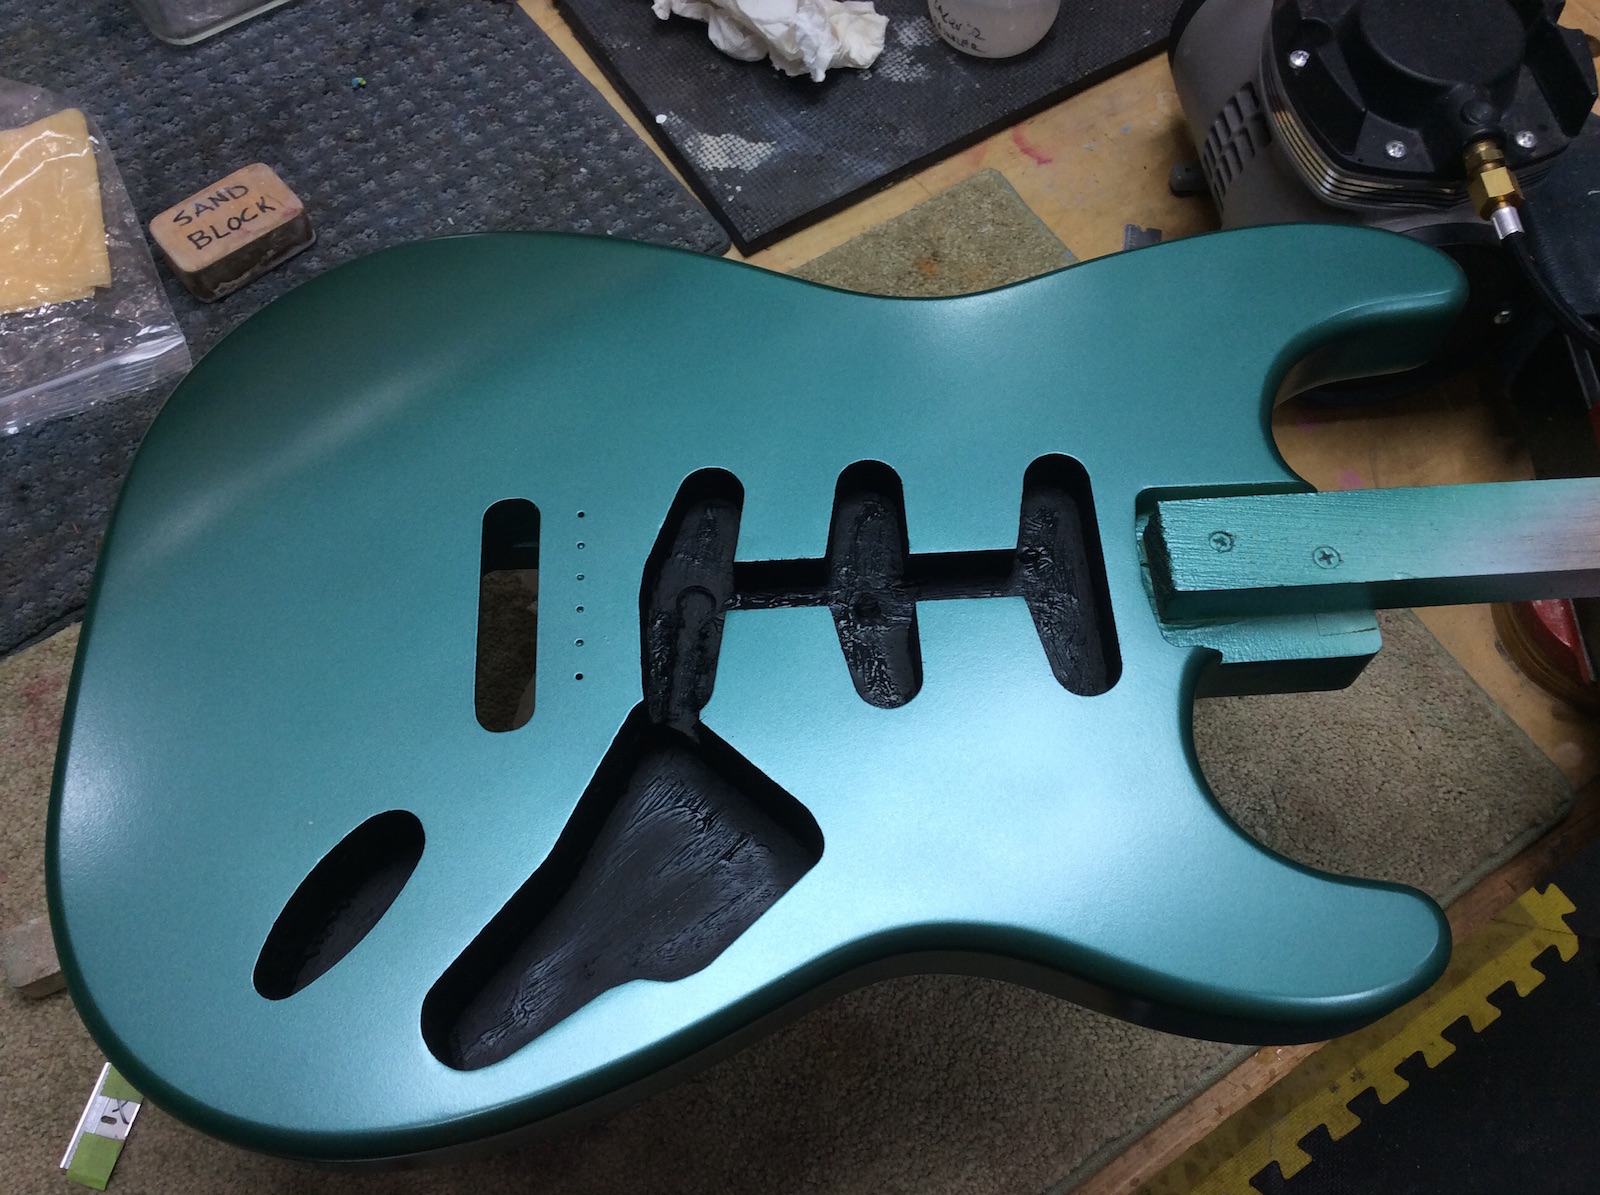
Strat in Gibson’s Inverness Green Metallic
Undoubtedly the Fender electric guitars from the 50’s are some of the most iconic instruments ever made. This past spring I decided to make a series of tele and strat style guitars, in homage to this classic design. But to make things interesting, a few twists to make them special for their ultimate owners.
The bodies are all made from Alder, selected for quality and weight. The necks are Eastern Hard Curly Maple, finished in amber for that vintage “found this gem in a closet” look. Speaking of finish, I selected nitro lacquer colors that are period traditional, rarely seen, yet gorgeous. Finally the hardware is nearly all American made boutique – the finest one can find, with pickups custom wound for each guitar.
All in all there are 6 guitars in flight. A strat on order from a client in Inverness Green Metallic, a Burgundy Mist Metallic tele, two Curly Maple over mahogany body guitars that will be nitro bursted. Finally my favorite – a matching pair, tele and strat, in a rare Capri Orange color with white binding and hardware details.
Eastern Hard Curly Maple
Curly curly maple
I am a big fan of Maple necks for guitars, including acoustics. If Maple is good enough for violins, it is good enough for guitars! Eastern Hard Curly Maple is a superb neck wood – elegant with visual depth, bright and clear tone which mellows slightly over two to four years of playing. An electric guitar is acoustically influenced more by the neck than the body, making the neck especially important to the overall sound.
So yes, the necks are curly, with rosewood fretboards, abalone fret markers and rosewood skunk stripes. They are completed with bone nuts and Gotoh staggered height adjustable vintage tuners, which in my opinion are the finest quality vintage style tuning machine.
Hardware bits
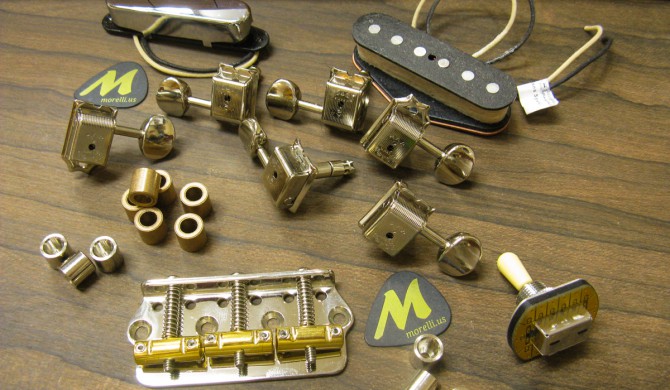
No corners are cut with the hardware. The highest specification components are made in the USA. One exception is for the Gotoh vintage tuners, as the Japanese product is simply the best quality in my experience doing repairs. The bridges and saddles are custom milled by Callaham in Winchester, VA or Rutters in san Diego, CA.
Pickups are hand wound and individually ordered from a crew I work with out of North Carolina. The rest of the hardware all American made from CTS, Switchcraft, CRL and Oak Grisby. It costs more to build guitars this way, but the end product is uncompromised. Of course all wiring is vintage pushback with oil-filled boutique capacitors, high tolerance pots and finally treble bleeds to keep tone balance across the volume range.
A Few Attentions to Detail
Since many of my clients play on stage, and single coils are the noiseful bane of every stage musician dealing with fluorescent lighting, careful attention is paid to shielding. Specifically the bodies are shielded using a special shielding paint in cavities and wire channels, which is then locked in during the clearcoat stage. Pickguards are shielded in copper, and ground wires connect the shields to the circuit ground.
Necks are carefully finished, dressing fret ends and ensuring smooth fretboard edges for comfort in playability. The bottom of the neck pocket is cleaned and leveled, ensuring a tight connection and proper angle for correct saddle height adjustment.
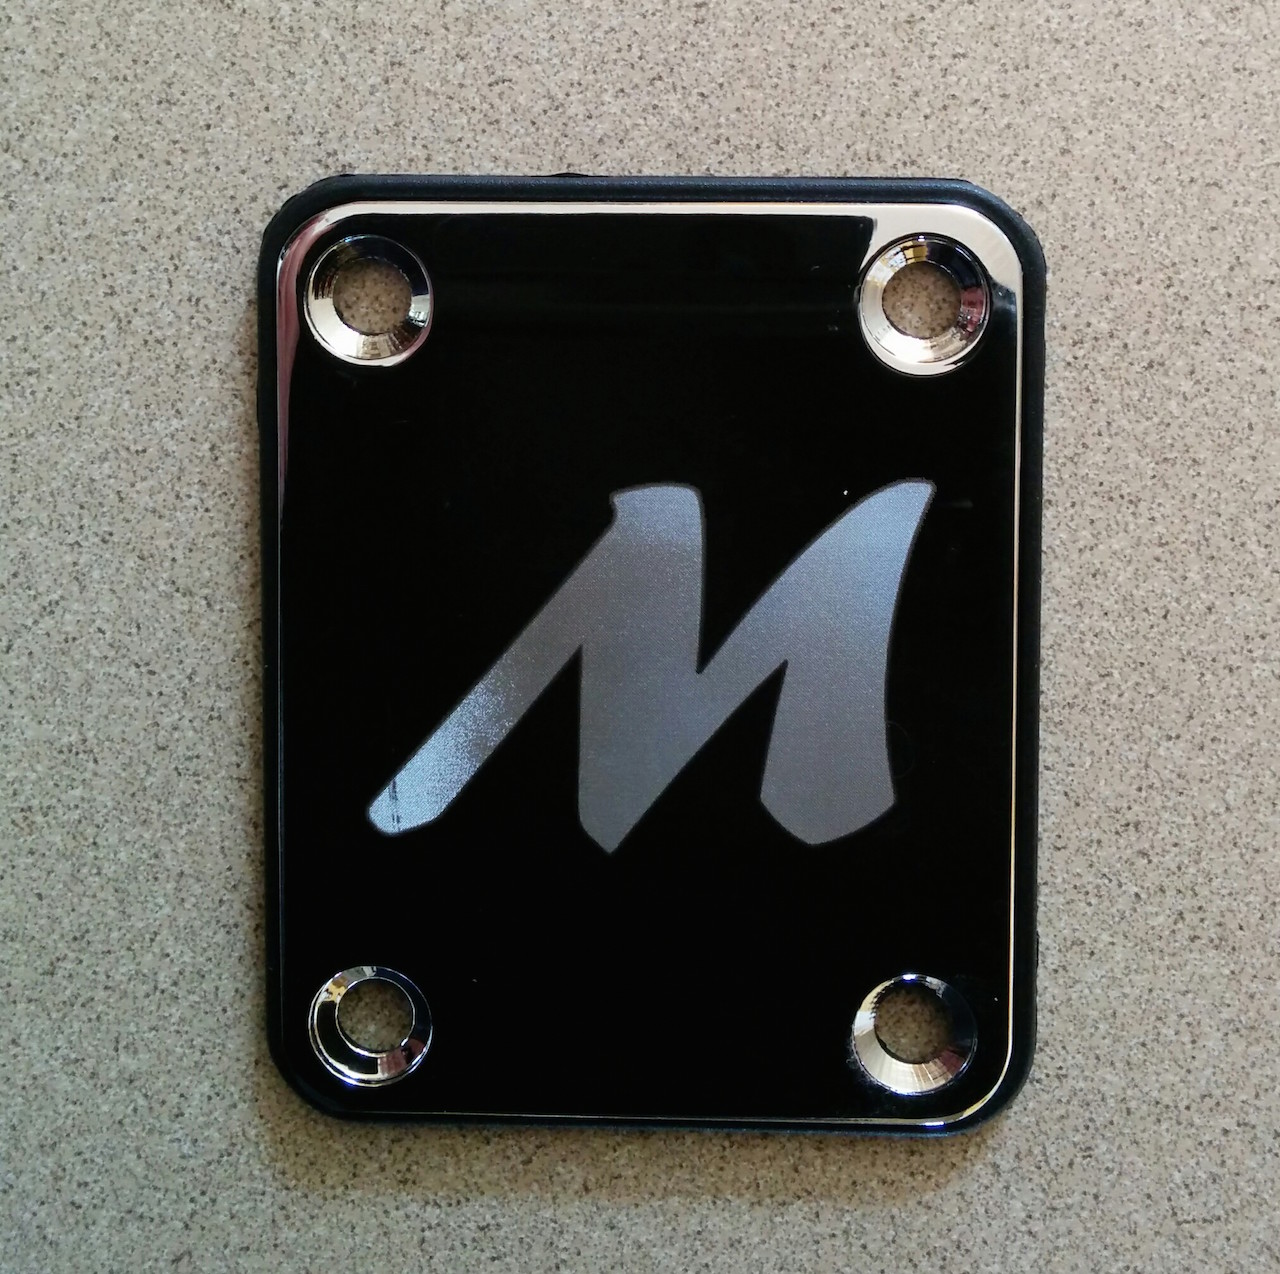
Finishes are very thin, allowing for the instrument to be resonant. It would be difficult for a factory to finish guitar in nitro lacquer as thin as I do, and warranty the instrument – one of the differences of a hand crafted guitar. To make a thin finish requires tedious attention to careful wet sanding – body, sealer, basecoat and clearcoat. Body color matched headstock logos and Morelli neck plates round out a few small touches without interfering with the essence of these iconic guitars.
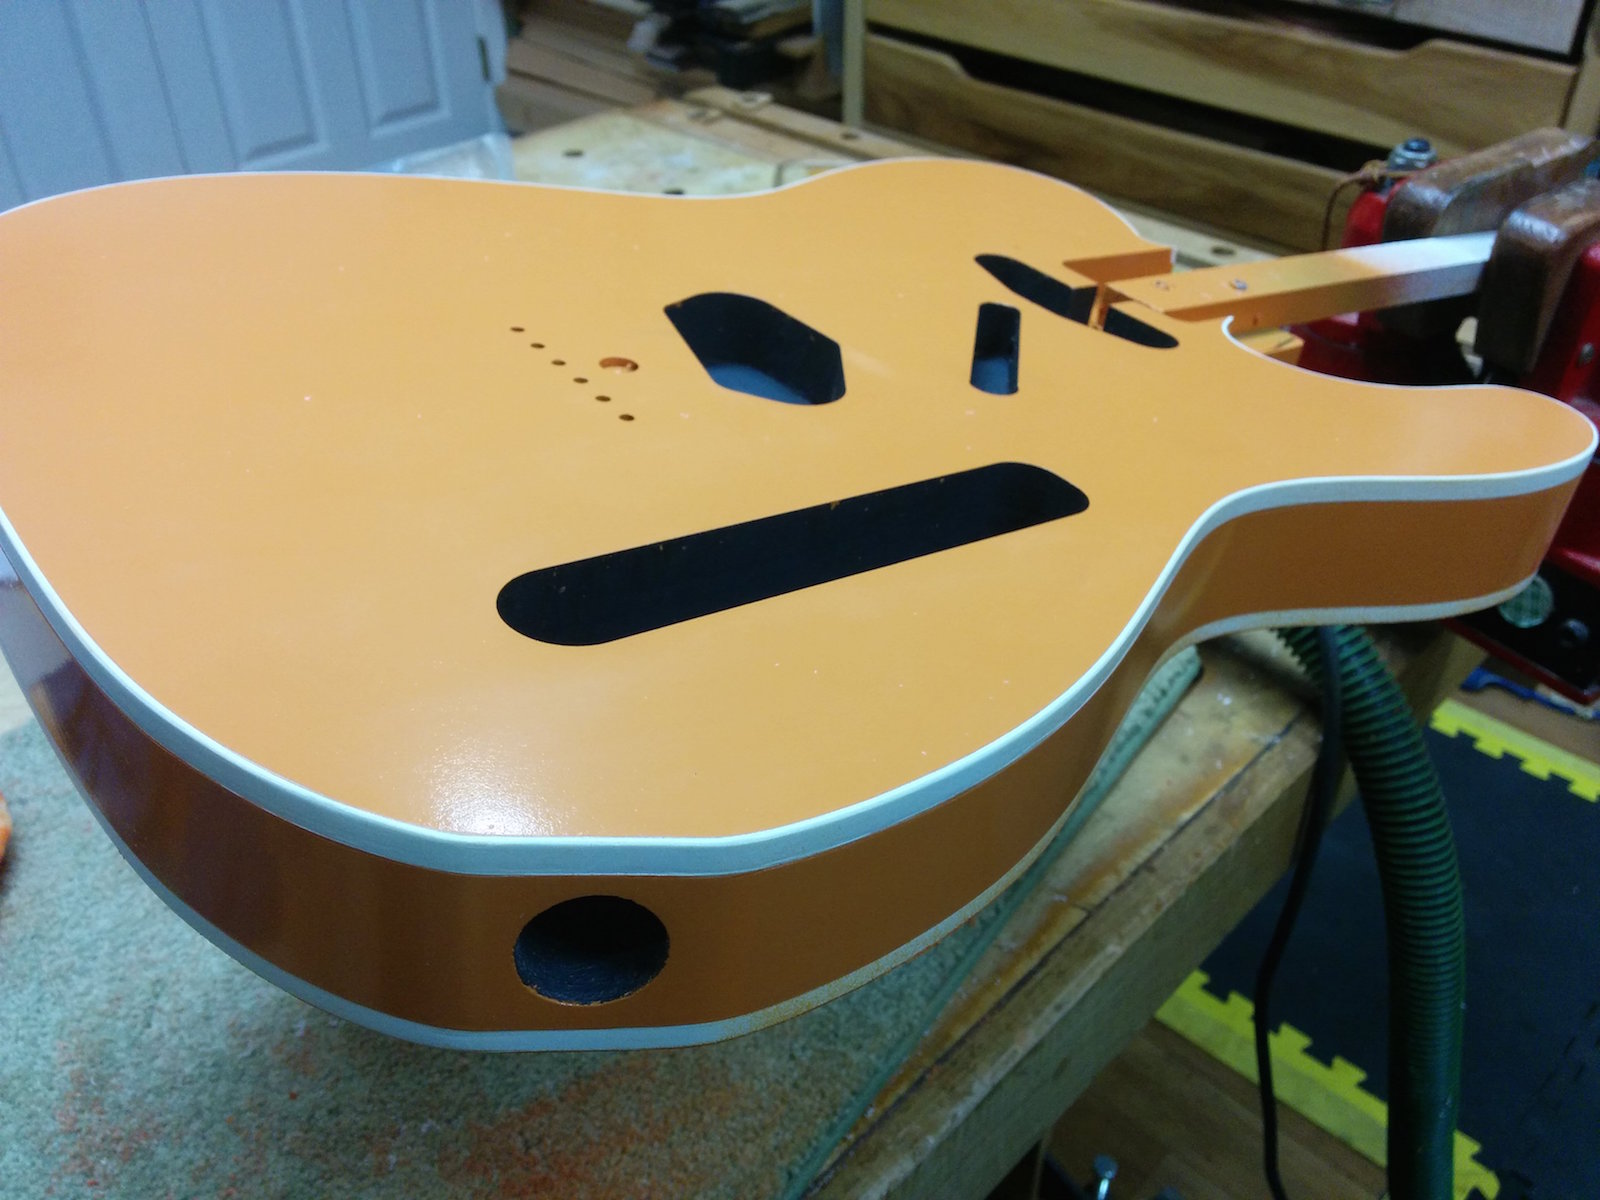
The Orange Creamsicle Set
In researching colors from the 50’s and 60’s I found that many of the Fender colors were borrowed from automobiles of the time. They are often pastels, soft in mid-tone color. Interestingly enough, Capri Orange is from a later era. For about one year, Fender painted Stratocasters in the late 70’s in this color, which is reminiscent of a childhood treat – the orange creamsicle. If one didn’t know any better, one might conclude this was a 60’s color, along with the rest of the famous Fender hues.
Once completed and in the hands of a future owner, they will be one-of-a-kind. Stunning partners with a unique look and quintessential sound of their original 50’s inspirations. Having the opportunity to work on guitars with this attention to detail in concept, style, sound and execution is exciting as a luthier. This is what brings me passion and attention into focus.
The telecaster received double white binding, set against the orange, framing the guitar’s presence. White single ply pickguards finish off the contrast. The necks are sprayed in an amber tint, with enough orange hue in the yellow translucent base to compliment the bodies. As a finishing touch, both guitars receive matching orange owl straps made by Couch in Chicago.

Final trimmings
These guitars will be protected by new Fender ABS hardshell cases which are form fitted to the bodies. While I often prefer the look of tweed cases, the new hardshell molded cases simply provide superior protection, especially for the gigging musicians where the cases are going to see a lot of public use.
As with all Morelli guitars they will come with hand-written hang tags, a numbered Morelli Guitars white pearl pick, Morelli Guitars microfiber cloth, a signed Build Sheet detailing all of the build specifications, and a lifetime warranty as is customary as I stand behind all my instruments.
Jul
22
[The previous articles can be found here: The retrospec – Introduction, Part 1 :: The retrospec – The Core Design, Part 2]
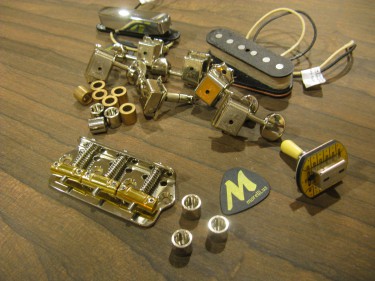
Sorting out the parts for the retrospec
Unlike a classical or steel string acoustic, electric guitars are chock full of electronic goodies and accessories. My uncle once told me that the more controls on an amplifier the less the chance you’ll ever find the sound you are looking for. I must say I’ve come to realize the wisdom in his comment.
But with that said, the retrospecss is an electric guitar so choices we must make. Thankfully this is one of several places where my co-conspirator, Saleh Sabat, is a whirling dervish of gear. So into the deep end of the pool!
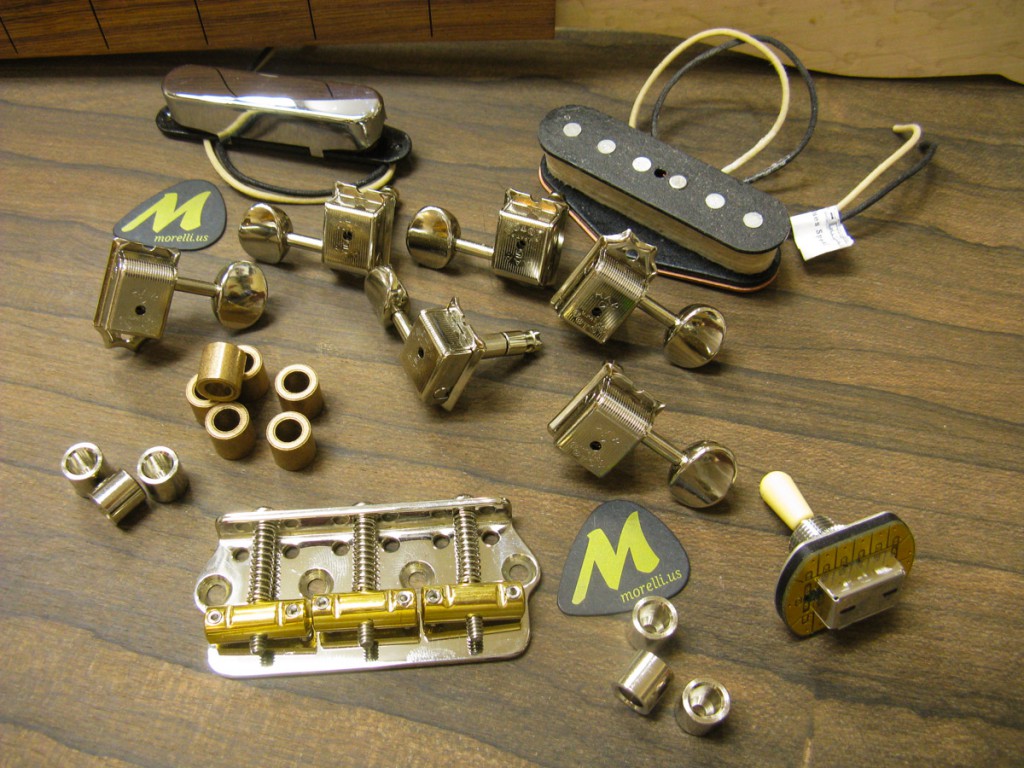
From Tuners to Bridge
Let’s start at the headstock and work to the body. Telecasters, for the most part, have always had string trees. We opted to go with staggered Gotoh tuners, requiring no string trees. Tuners will be mounted without top nuts, but rather with the shafts sleeved and free floating in the headstock.
Snake Oil pure Nickel Strings with Buffalo Bone white nut material
From the tuning shafts we mount pure nickel Snake Oil strings. As the strings come to the fretboard, they are supported by a white Buffalo bone nut, which is very hard. This is a small but important detail. The nut slots are polished and facilitate string bending. How so, you ask? We designed the headstock slightly longer than a stock Fender neck, then removed the string trees, ensured the string are a straight line from bridge to tuners.
We then went with the hardest nut material we could polish – all of this to create additional unencumbered string length behind the nut to ease string bending. These are the kinds of details we think about when spending six months designing a guitar!
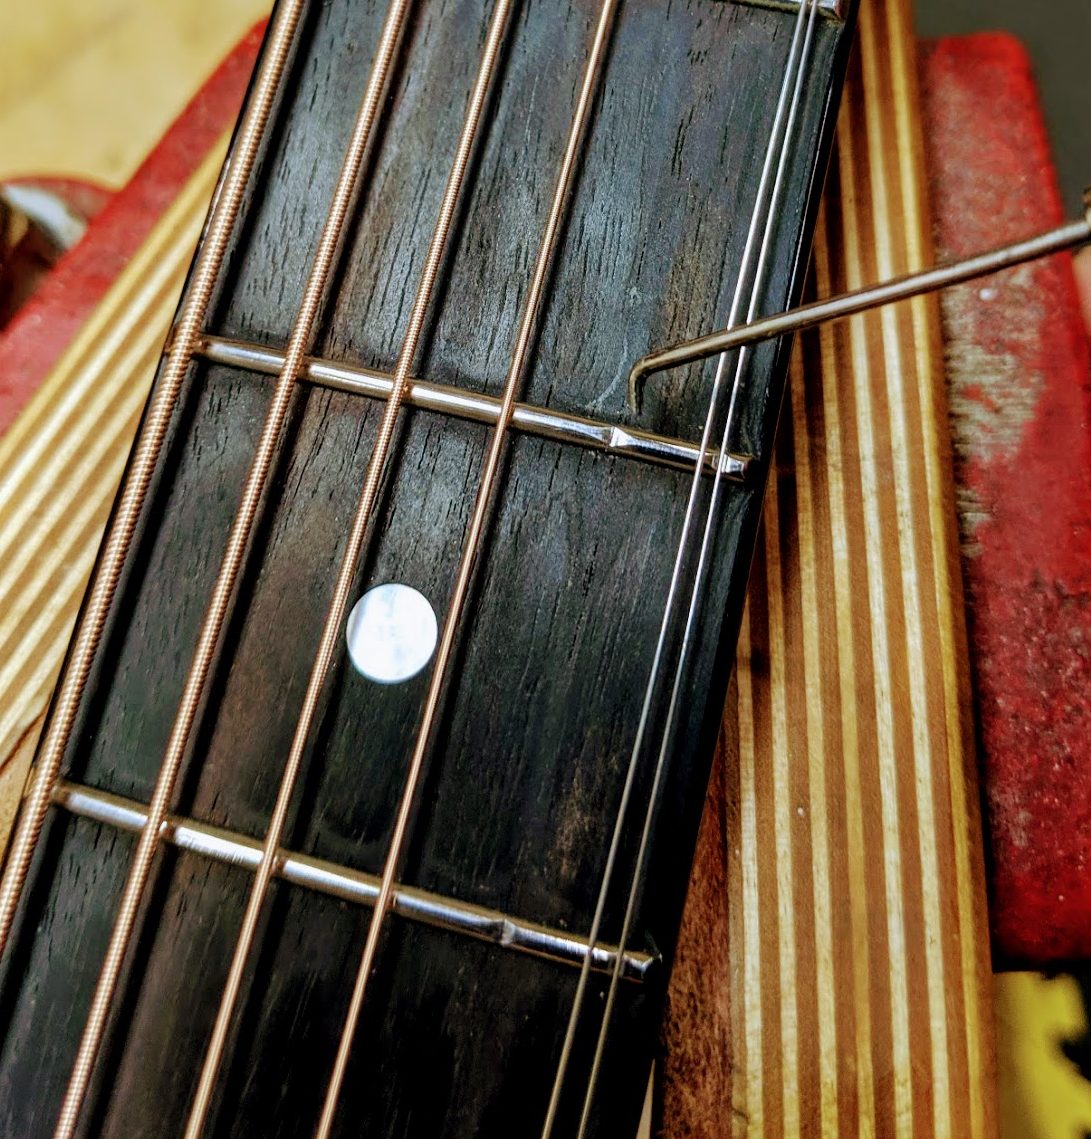
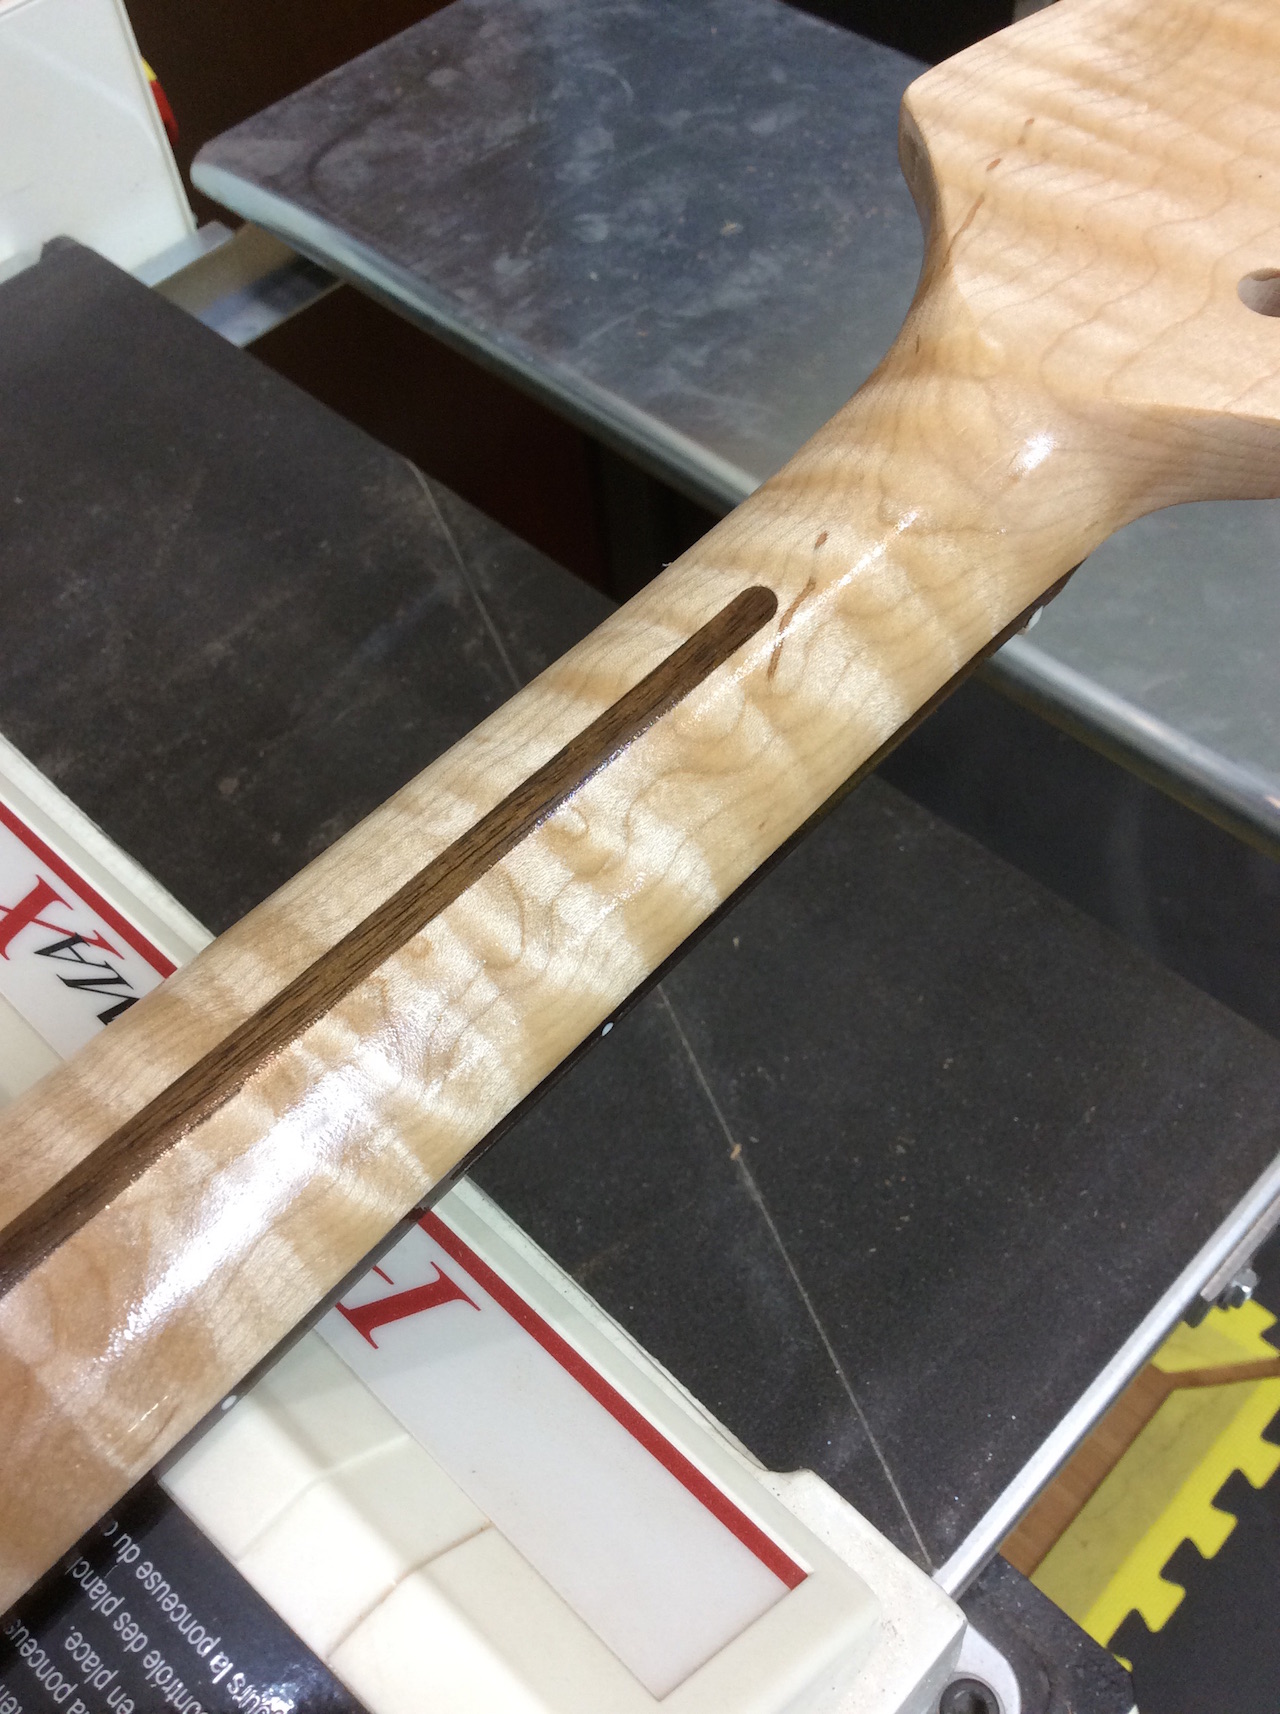
Evo wire on a Ziricote fretboard.
The strings make their way over Evo fret wire, which is a fairly new fret material made by Jescar. Evo wire is harder than regular nickel frets (better bends and better wear) but doesn’t feel different like stainless steel frets. A shiny gold color when new, Evo wire eventually oxidizes to a dull gold color which looks very attractive, both on maple necks and darker fretboards. Underneath the frets is a two way truss rod, which can be adjusted by removing the neck pickup backplate.
Finally at the body end, the strings crest the brass saddles of a Rutters Chopped Bridge. Machined from cold rolled plate steel, it is both elegant and tone enhancing. The strings finally pass through the body and are secured by flush mount chrome ferrules.
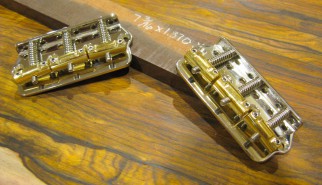
Custom steel bobtail bridge with compensated polished brass saddles
Unlike Fender guitars which mount the neck perfectly horizontal to the body, the retrospecss will have a mild neck back angle. This allows us to project a slightly higher string height over the saddles, which we find better contributes to the guitar’s tone. The added height will add a sixteenth of an inch of saddle height, without requiring a taller neck mount or higher neck pickup setting.
Pickups
The retrospecss is available with four different pickup configurations. The first will be the standard Telecaster bridge/neck pair. The second, a Nashville version which adds a third middle pickup and unique six-way toggle switch. The third configuration will be the minimalist’s guitar – a single bridge pickup. Finally a special Charlie Christian version of
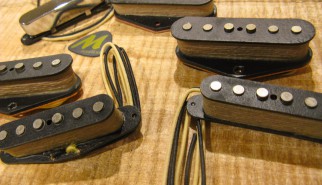
Custom wound pickups, specific to the retrospec
Unlike the Telecaster, our pickups will be rear mounted and rear adjusted. The front body routs will allow the top of the pickup to protrude through the body. The back plates will be made from the same body wood material, yet carrying more wood mass behind the pickup. The pickups will mount to the back plates and their height adjusted from the rear.
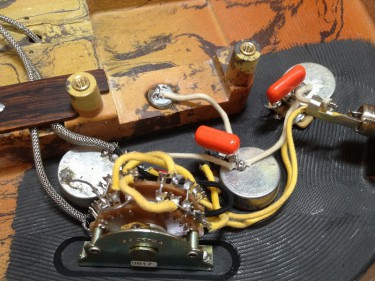
Electronics and Control Gear
High quality electronics are important to an accurate and well focused sound. The retrospecss starts with CTS pots with 10% tolerances. The tone pot is no-load, so it can be completely taken out of the circuit (along with the capacitor). Wiring is vintage cloth. The capacitors are oil filled, new old stock from Russia, which are known for great tone. The jack is Electrosocket mated to a Switchcraft jack, which is a far superior solution to the traditional Tele cup. Finally the switch is a 3 way toggle, as one would see on a Gibson, but still maintaining the round Telecaster style switch tip.
Like the pickups, the tone and volume controls will be mounted through the rear. Instead of being surface mounted, the front routs will allow for the knobs to protrude through the top. Controls will be mounted on an inner cavity plate, allowing the knob depth to be adjusted.
Jul
22
[The previous article can be found here: The retrospec – Introduction, Part 1]
I have always been a student of design, fascinated with how people create from their imagination. Having worked across a number of mediums over the years, I’ve enjoyed carrying inspiration from one discipline and applying it to another.
In the case of the retrospecss our goal was to bring forward the essence of the classic Fender® Telecaster®, accentuating its iconic aspects and removing those design elements which detract from the guitar. Obviously such an exercise is one of personal interpretation!

The French Connection – Coddington’s interpretation of the Lincoln Roadster.
The French Connection
I know of few people better at the game of reductionist design than hotrodder, Boyd Coddington. While customizing cars has been an American passion for sixty years, Boyd took the craft to a high artform.
Striving to create a crisp visual representation – accentuating lines, perfecting proportions, and shaving off parts such as door handles – Boyd’s cars always evoke a deep sense of style and beauty. His use of color was often minimal, accentuating the overall form in two colors or using one to allow the underlying shape to speak for itself.
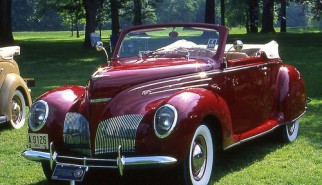
1939 Lincoln Zephyr, as original as they came.
When we began working on our modern interpretation of the Telecaster, I immediately thought back 20 years to when I read Boyd’s (then new) books. I spent hours studying his designs and settled on Boyd’s last work before he passed away. Named the French Connection, Coddington’s creation was based on the 1939 Lincoln Zephyr as its inspiration.
Much like the Tele, the Lincoln Zephyr was a beautiful design, yet contained several stodgy elements. With smooth flowing lines, the Zephyr is nonetheless upright with broad step up rocker panels, an abrupt snout and period whitewall tires which detract from the essence of its shape. The bumpers and mirrors, while functional, are details which detract from the flowing shape.
Shaping the Body
Jumping right into the retrospecss there are a few basic elements that I wanted to address – the horn on the Tele looks bulbous – almost as if someone designed the cutaway with a hole saw. I reshaped the lower horn, creating a more gentle transition. Furthermore the shape of the body above and below the fretboard was re-curved to increase fretboard access while also creating a better visual line.
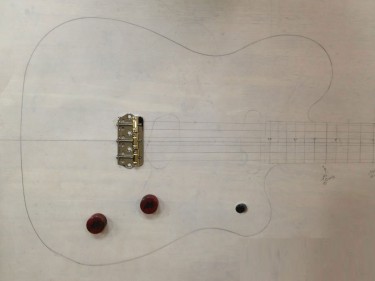
retrospecss body outline with mock hardware.
A few design elements are not evident in the drawing. The top of the body will be slightly carved with recurve, just enough to reflect light at different angles. The back of the body will have a tummy cut like the Stratocaster®.
Unlike the Tele, the body to neck transition will not be square but rather transition as a smooth curve. As a result the necks will not have a bolt-on plate but rather a 3 bolt system, freeing up the treble side of the body to be carved to meet the neck.
Finally several details on the body face depart from the classic Telecaster. Gone is the bulky “ashtray” bridge, replaced with a an elegant bobtail bridge. The chrome control plate is removed, the tone and volume staggered to follow the body line, and a 3 way toggle switch (with Tele switch tip) centered in the lower horn. Finally the bulky pickguard is removed and the pickups are rear mounted, with front routs just large enough for the pickup bodies to protrude.
The Headstock
Headstock designs always have a strong visual correlation to guitar makers. Fender electric headstocks, for example, mount tuners on one side and tend to have a similar (but varying) curvature on the treble side. There are many mediocre headstock designs (after all beauty is in the eye of the beholder). Designing an elegant headstock can be no small feat.
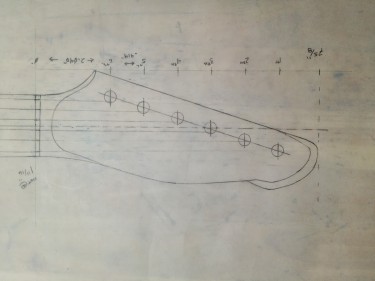
Headstock design maintains inline tuners with Starcaster flair.
The retrospecss headstock creates both a more elegant treble side shape and more consistent proportion from end to end. The headstock is also slightly longer and introduces a relieved tip that is reminiscent of the Starcaster. Finally a more unique transition from the fretboard to the headstock brings a more elegant transition versus Fender headstocks which have a simple swoop designed to be shaped on a cylindrical sander.
The next article will discuss the hardware choices and how they are mounted to the body. There are some unique design decisions which we’re excited to see come to life!

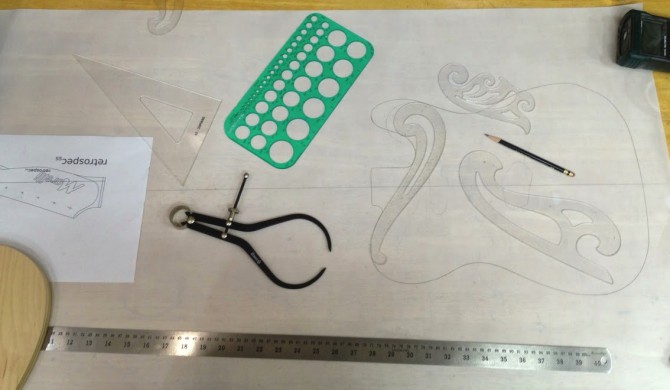
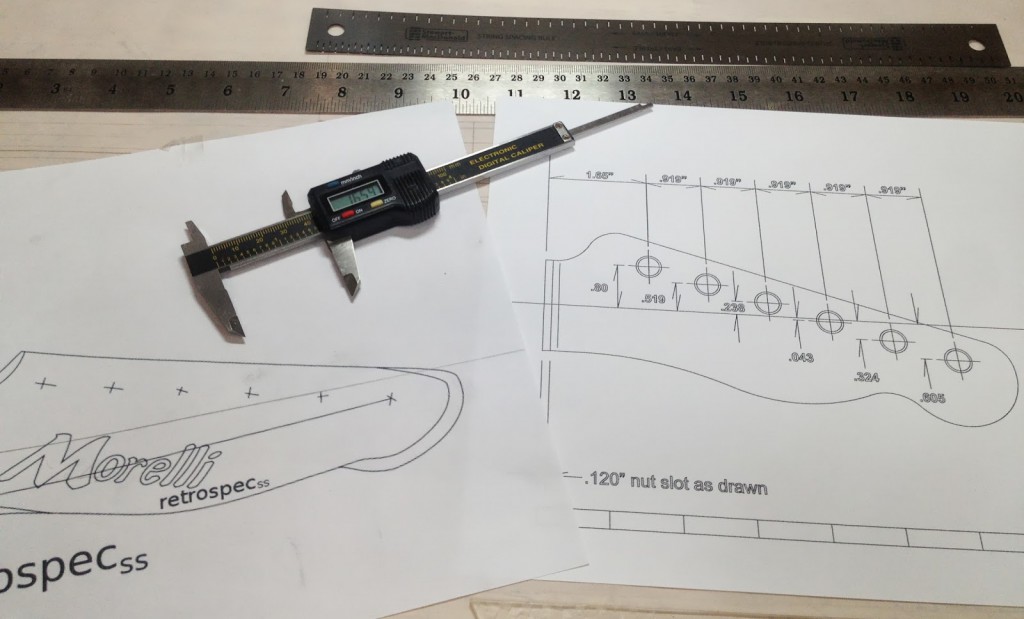
Drafting templates. Vellum. Digital calipers.
Jul
22
At the beginning of the year a number of Fender® Telecasters® came through the shop for various repairs. Their unique sound and affordable price have made them popular for over half a century. Consequently there are no lack of Teles® in need of setups, refrets or upgrades. I’ve always enjoyed the Telecaster’s unique sound and iconic design. In fact the Telecaster has become so iconic that Fender’s attempt to receive trademark protection of its shape was denied in 2009 by the U.S. Trademark Trial and Appeals board.
Leo Fender designed these guitars to be built with cheaply available materials, a simplistic shape and rudimentary assembly techniques that could be executed by unskilled labor. The ease of construction is clearly seen in 1950's footage of the Fender factory . While a fan of the Telecaster, I wondered how might a Telecaster look and play if designed today for skilled production?
As I began to conjure alternate designs, my good friend and superb musician Saleh Sabat began waxing poetic about the Tele. You see he’s a big fan of Leo’s creation and has even assembled his own mongrel Tele courtesy of Warmoth and a half dozen other boutique manufacturers. Be it the chicken pickin’ twang or good looks of a worn out Telecaster, Saleh had a lot to say about what made good ones sing. It became obvious we had much to do.
Saleh Sabat’s “Chewie” – a starting point.
At the beginning of 2013 we began what became a six month journey to design a new guitar – one inspired by several Fender icons – primarily the Telecaster, along with the Stratocaster®, Starcaster® and Jaguar®.
The nascent guitar’s new name, the retrospecss, seemed fitting – the subscript representing Saleh’s initials.
Our goal became clear – to design an elegant and sometimes ingenious guitar that retained the essence of the icon, in sound and design cues, yet embodied a completely new and modern interpretation.
The culmination of ideas has been codified on vellum with french curves under the lead of a Mirado Black Warrior, in design spec documents, and a stream of SMS and Facebook message long enough to write a small novel. A relentless pursuit with many epiphanies, we have strived to leave no detail unturned. Along the way I constructed a standard Telecaster to gain a more intimate understanding of the instrument. We’ve now acquired the woods and the hardware; it’s time to build templates, jigs and develop the construction processes. Over the next six months we’ll be creating four retrospecss guitars. We hope they do their iconic inspiration justice.
We just may have a few great ideas up our sleeves and we’re looking forward to sharing them with you! Keep an eye out on our blog as we begin realizing the retrospecss from our imaginations to wood, metal and electricity.
Comparing the retrospec headstock design to the Telecaster.
Jul
22
Made from Spruce fibers formed in a vacuum composite, the Flax is a rather unique hollowbody electric. A new process invented in Finland, Spruce is shredded along fiber length then mixed with a resin to form the body. A colleague of mine had a connection which led to our receiving two bodies and necks. This is the first guitar built in the USA from this process, to my knowledge. How did it work out? Well it sold quickly to the first customer that played the instrument.
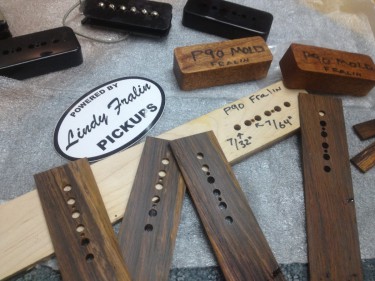
Vintage cloth connects CTS pots and a Superswitch. Orange Sprague capacitors.
I had Lindy Fralin wind the single coils. The wiring is super slick – a 5 way 4 wafer superswitch and some modifications to the single coil wiring allows for parallel, series and series out of phase configurations. The black finish is a special electrical insulating paint which I use at the controls and in the pickup cavity to reduce noise in the circuit.
The tone pots are no load which allows the player to take the tone pot (and capacitor) completely out of the circuit. Quite a bit of versatility with minimal controls.
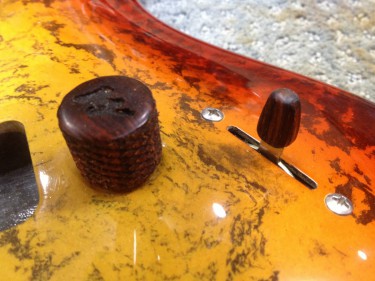
Knurled Cocobolo Rosewood Control knobs and switch tip.
Typically Morelli electrics have the M signature logo in the headstock. Given the flying eagle landing on the truss rod, I moved the logos to the control knobs. The knurled surface provides a very positive feel, and very unusual detail on electric guitars. This is more often found on the grips of high end pistol grips and rifle stocks.
White MOP fly Eagle inlays.
The inlays are individually made feather and body sections, mostly in varying pieces of white Mother of Pearl. The birds are assembled on cardstock, then glued together, finally sanding off the cardstock. It is far easier to inlay one bird rather than its twenty constituent pieces.
Given the unusual black dyed Spruce composite neck (the fretboard is not black Ebony) a few tricks were necessary to get an effective fill during the inlay process. Dust was made from the fretboard material, along with cyanoacrylate. The fretboard was then black dyed again to ensure a uniform finish. As a final detail, the fretboard side markers were finished in a special glow-in-the-dark orange dots – quite visible in dim light onstage.
Tobacco Orange Burst in Nitrocellulose Lacquer. Translucent edge shows swirled Spruce.
The sunburst colors were progressively mixed from a single base to create a fluid transition from amber to tobacco orange. The edge was sprayed light enough to allow the black swirls to also show at the darkest parts of the tint. Unlike Flaxwood guitars finished in urethane, this guitar was shot in nitrocellulose lacquer.
At the beginning of construction, body and Cocobolo Rosewood.
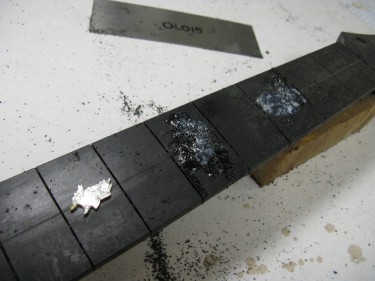
A full fret level and polish was performed to ensure we could dial down the action to where it played like butter. Careful attention was placed to round the fret ends and chamfer the fretboard, ensuring the best possible left hand comfort and playability.
Can we build one for you? Absolutely. To see more picture of the finished guitar, check it out in our Portfolio Page..
Feb
20
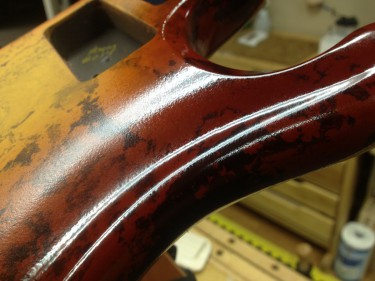
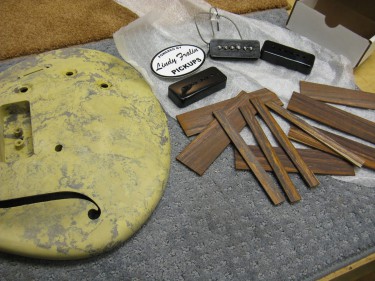
Everyone has their pet peeves I suppose. I am not a huge fan of plastic on guitars, be it binding, purfling, electric guitar knobs …. or pickup covers. My guitars are carefully designed, sculpted and finished with just a bit of obsession to details.
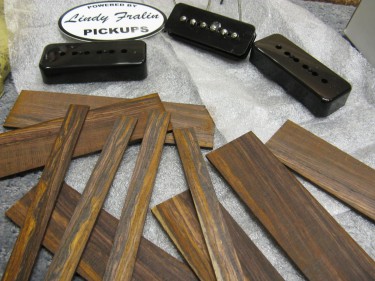
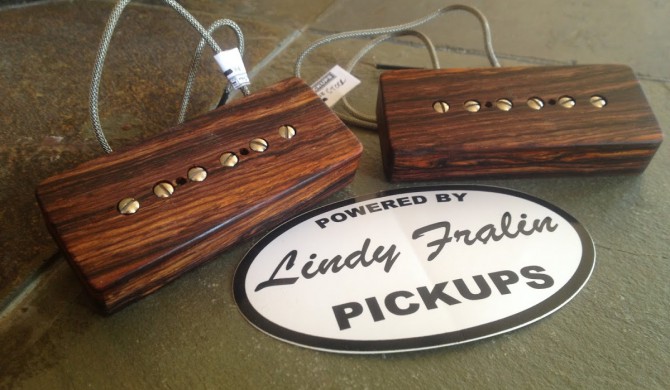
Cocobolo Rosewood cut for pickups
For pickup covers, first I select the wood which compliments the guitar. In this case the instrument is to be finished in a orange sunburst. Cocobolo Rosewood is the obvious choice, with rich orange colors and wonderful dark ink lines. Cocobolo is a fantastic wood – hard, resonant and beautiful. The wood oxidizes over time, darkening to very rich and warm hues. Unfortunately Cocobolo dust is also very dangerous to breath. It is a sensitizer – the more one breathes the more one is likely to incur increasingly allergic reactions. When cutting and sanding, precautions are taken, vacuuming with a HEPA filter and wearing a protective breathing mask.
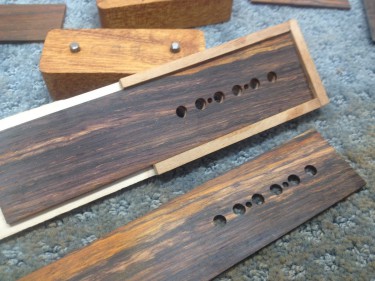
Top cover carrier used to index magnetic pole and screw holes
With the holes drilled I finally start assembling the pickup covers. P90 plugs are made from Mahogany and have 3/16″ steel pins to correctly register the pickup cover on center. The sides are tacked in place with cyanoacrylate (super glue). A bit of paste wax keeps the plug from becoming glued to the cover. Once the sides are glued to the cover top, the plugs are removed.
Tooling jigs – plugs and drill index carrier – for drilling and assembling covers
Covers take several hours to create. A small detail, maybe, but such details bring design cohesion to the final instrument. Do the rosewood covers contribute to the tone of the instrument? Of course not – but I’m sure someone will speculate nonetheless!
Jan
31
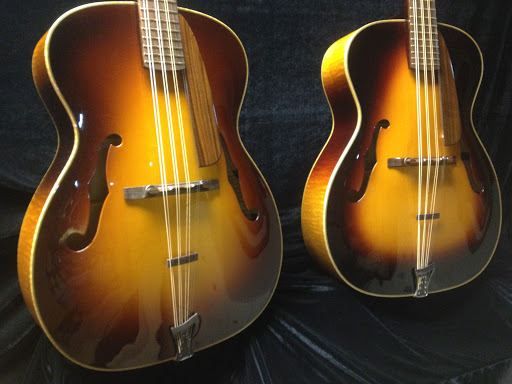
 We are excited to announce that we recently won an instrument building competition. Partnering with luthier Todd Stock we set out to build a matching set of Octave Mandolins. Judged by luthiers, this matching set took first place. These instruments were very unique – one third violin, one third mandolin and one third acoustic guitar.
We began building the pair of octave mandolins in August 2012. Inspired by the work of luthier Fletcher Brock, these instrumental twins were made from the same timbers with slight variations in details and finish . Eastern Hard Curly Maple comprised the back, sides, neck and binding. Canadian Spruce was hand carved and tap tuned to produce a very responsive carved archtop. Finally the fretboard, headstock, bridge and suspended pickguard were fashioned from Bolivian Rosewood. The finish is a vintage tobacco sunburst shot in Nitrocellulose Lacquer.
In the hands of a very capable gigging musician, this instrument now resides in Colorado. For details on the final instrument, please view the portfolio.